The
nutrient temperature is extremely important to the plants health and
need to be kept between 65 and 72 degrees for good plant health. A
lower temp is general OK as long as it does not get much lower. But a
higher temperature simply will not result in healthy plants. I have
already designed plans for a Geothermal Energy reservoir, as well as a
Geothermal energy heat exchange coil system. But there are cases where
a in ground
system is not possible. Examples of places that
Geothermal energy is not really useful without running lot of pluming
to and from it would be in some greenhouses (with solid floors), on a
cement patio, on a deck, in a garage or basement, and even an apartment
balcony.
Because there are so many variations that can be made
from this design to accommodate any size reservoir or reservoir's,
these plans wont have any sizes or dimensions for building it. The idea
is to measure the reservoir/s you have (or want to have) and build your
cooling box to fit your needs. Though it should give you a good idea of
how to construct it for durability, as well as functionality. The plans
and diagrams in this example are drawn around fitting 2, 32 gallon
trash cans for reservoirs. With a inside diameter of roughly 3 feet
wide, 5-6 feet long and 4 feet tall.
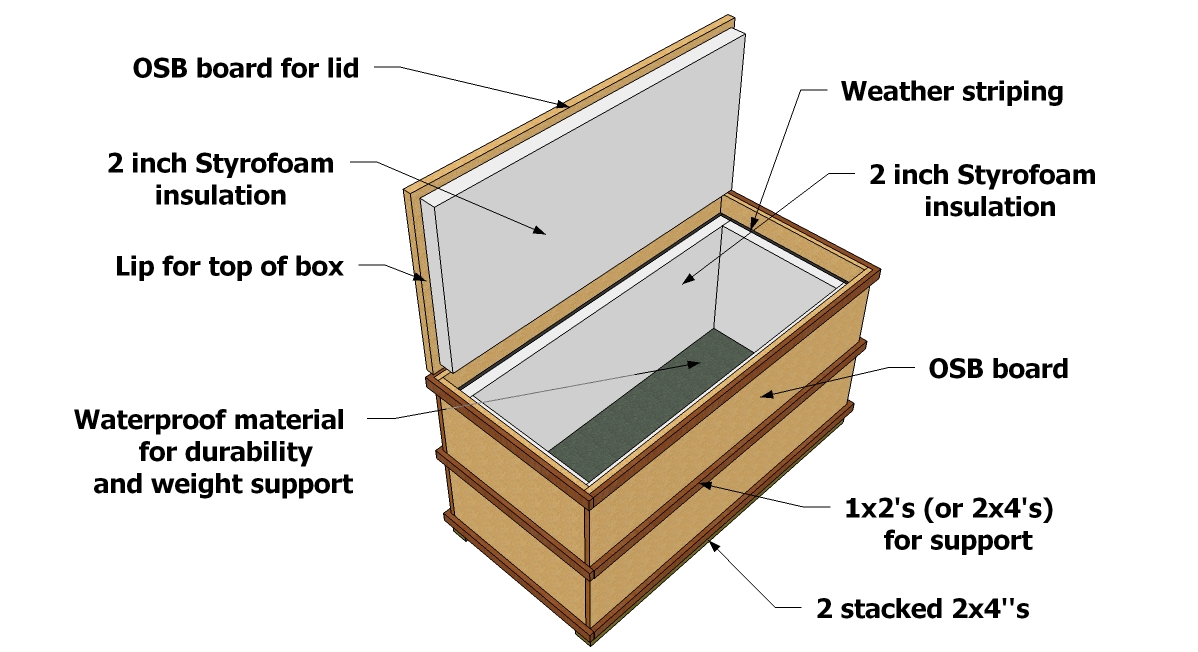
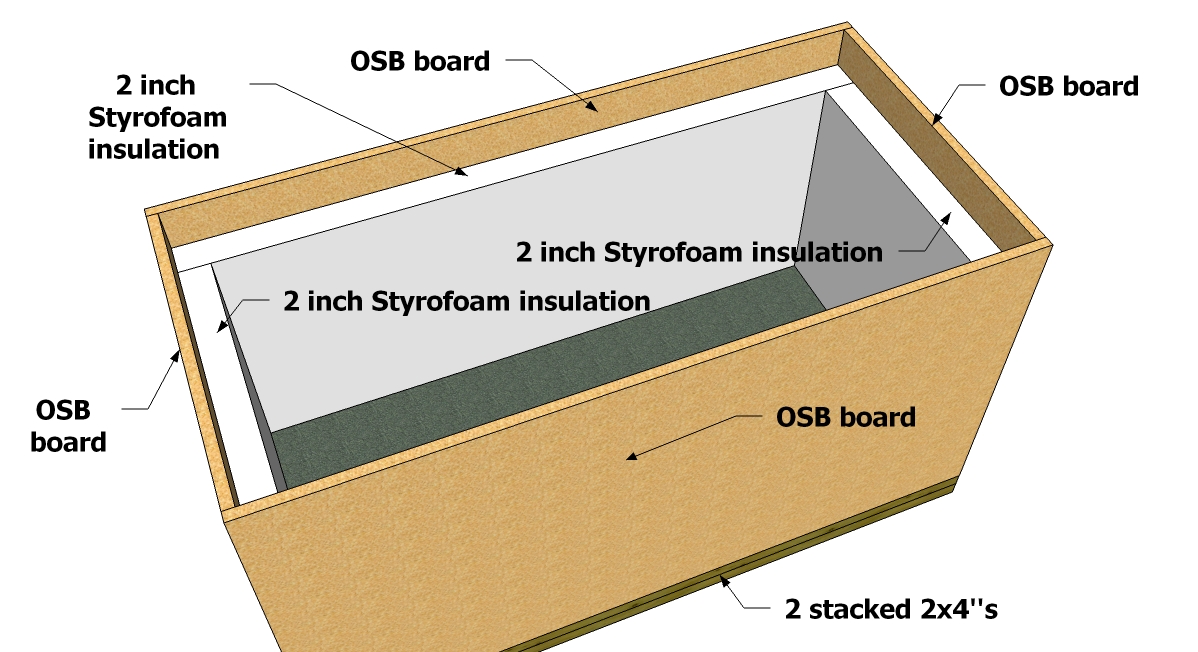
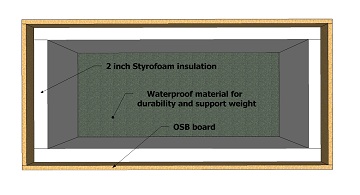
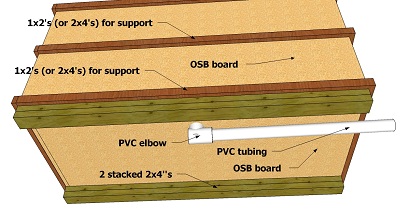
The
base of the box is fairly simple. Starting with the OSB board, this is
basically the outside bottom of the box. Below that is the feet to
support the box. It should be at least 4 inches high (you'll see why
later in the build). The simplest way to do this will probably be
screwing together 2, 2x4's, Then screw it to the OSB board. You may
choose to use 3 2x4's for added height.
(Note: I recommend the OSB board because it's usually less expensive than plywood. But should give you plenty of support).
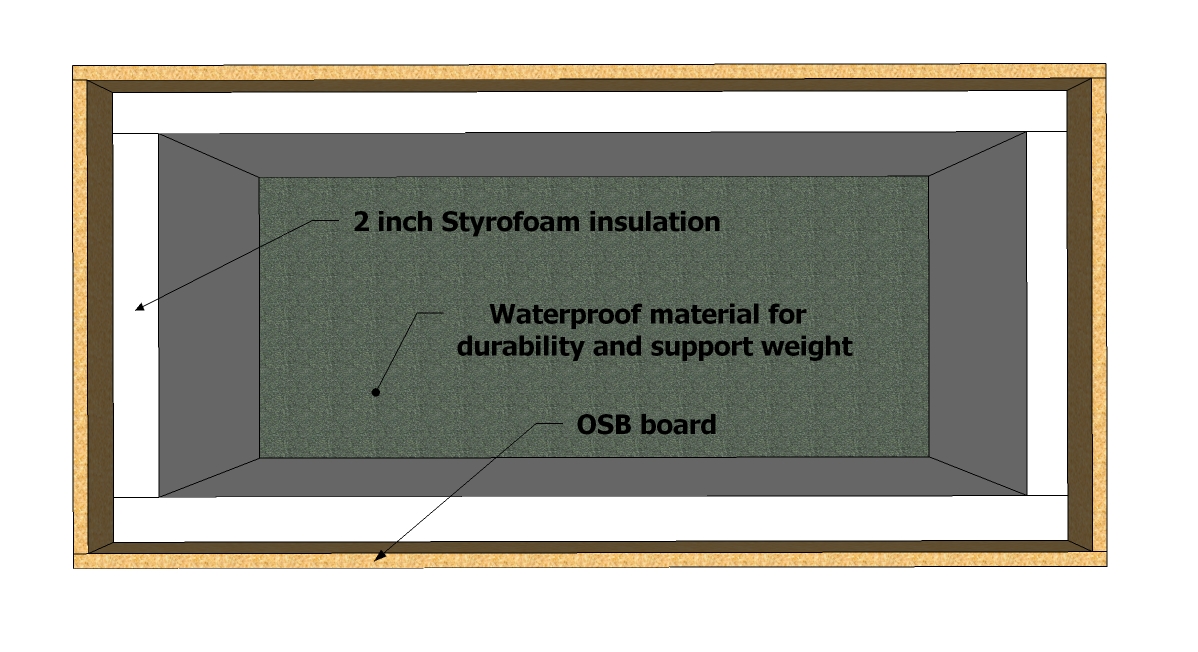
Then
for the heart of the box, the 2 inch thick sheet Styrofoam insulation.
This is a common insulation used in home construction and you can get
it at most home improvement stores. It's usually sold in 4x8 foot, and
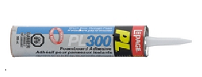
2x4 foot sheets. Glue the Styrofoam insulation to the OSB boardusing
Foamboard Adhesive, leaving a lip the same thickness as the OSB board
that you are using. This lip will support the weight of the sidewalls
of the box. Then glue a sheet of waterproof material on top of the
Styrofoam insulation with the same adhesive. This will support the
weight of the reservoir without damaging the Styrofoam, and will need
to be a waterproof material or it will rot when it gets wet. Make sure
it's the same length and with as the Styrofoam insulation and covers
the top of the Styrofoam completely.

Now
that you have built the base to the cooling box, you need to build the
sides. This is pretty straight forward. Just cut the OSB board to size.
Then set it on the lip of the base of the box and screw the edges
together. I would recommend for added durability, applying wood glue in
the seams before screwing it together.
Once you have the sides
of the box in place, you can measure and cut the Styrofoam insulation
to fit tightly. It should not go all the way to the top of the box. It
should be 2 inches short of the top edge of the box (or the same
thickness as the Styrofoam).Then glue in the sidewall Styrofoam
insulation, using the same Foamboard Adhesive.
Once
it is all glued in place take the time to seal all the seams with 100%
silicone to further waterproof, and air proof the box.
At this
point it would also be advisable to line the inside sidewalls with the
same waterproof material as you lined the bottom with. This would add
durability to the cooling box, and make it last longer without any
major maintenance. Although, Styrofoam is waterproof, and as long as
all the seams are sealed with 100% silicone, the inside of the box will
be waterproof at this point.
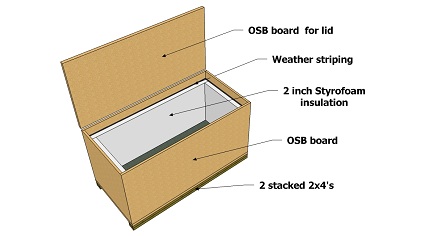
Now
it needs a lid. Measure the top outside edge of the box, and cut a
piece of OSB board to that size. Place the lid top of the box lining up
all the edges. Then hinge one side of the lid with strong hinges. Now
measure the inside top of the box (just above the the Styrofoam
insulation). Then cut a piece of Styrofoam to these measurements. Lay
the Styrofoam insulation down (inside the box), so it rests on the 2
inch ledge of the sidewall insulation. Then spread the Foamboard
Adhesive all around on it, especially around the edges. Then close the
lid compressing them together. Open it back up and clean up any
excessive adhesive, then let dry overnight. Now add a strip of weather
stripping along the top edge of the Styrofoam insulation that's inside
the box, this will help give you a air tight seal.
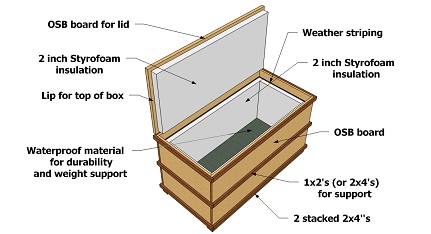
Now
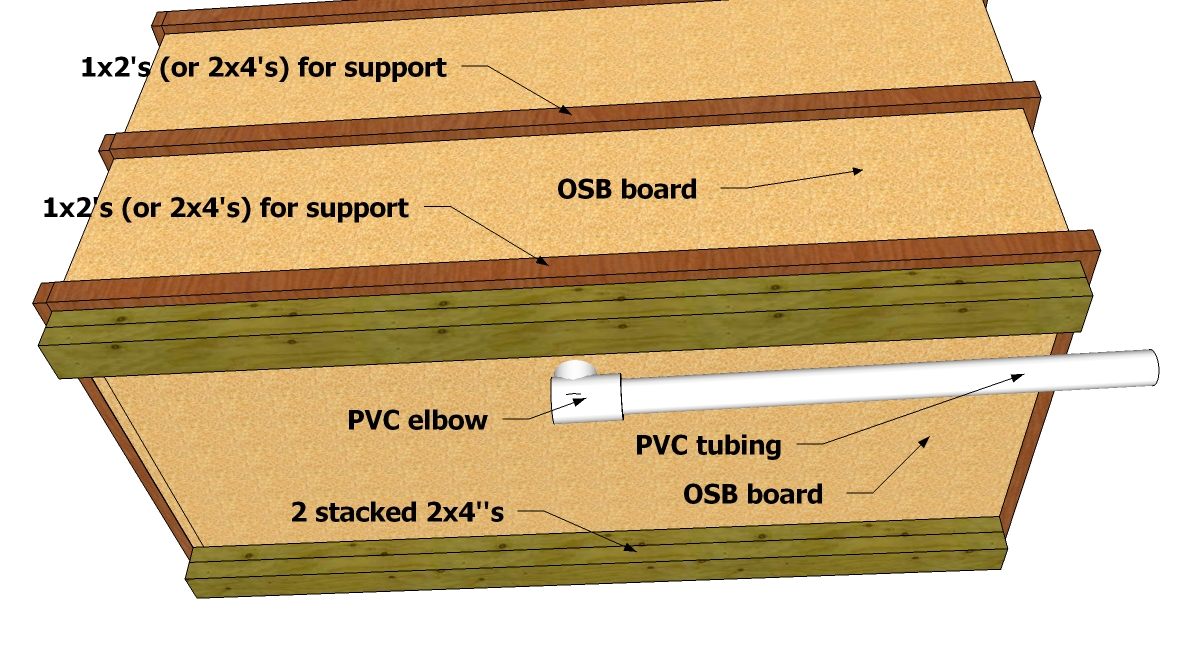
that the lid is in place, you should sturdy up the outside sidewalls.
1x2's should work just fine for this, but 2x4's will make it even
stronger. You should run them lengthwise all around the edges on both
top and bottom, and then along the middle as well.
Basically
what you have now is a huge durable ice chest. This wont be able to
transfer the heat out of the nutrient solution and into the ground like
the Geothermal energy designs will. But it will be able to keep the
outside temperatures outside of the box, and cooler temperatures inside
of the box.
There
are so many options that can be done to customize this box for your
particular needs, that I can't possibly show them all. So I will show
you the basic idea of how to go about creating the functional openings
needed.
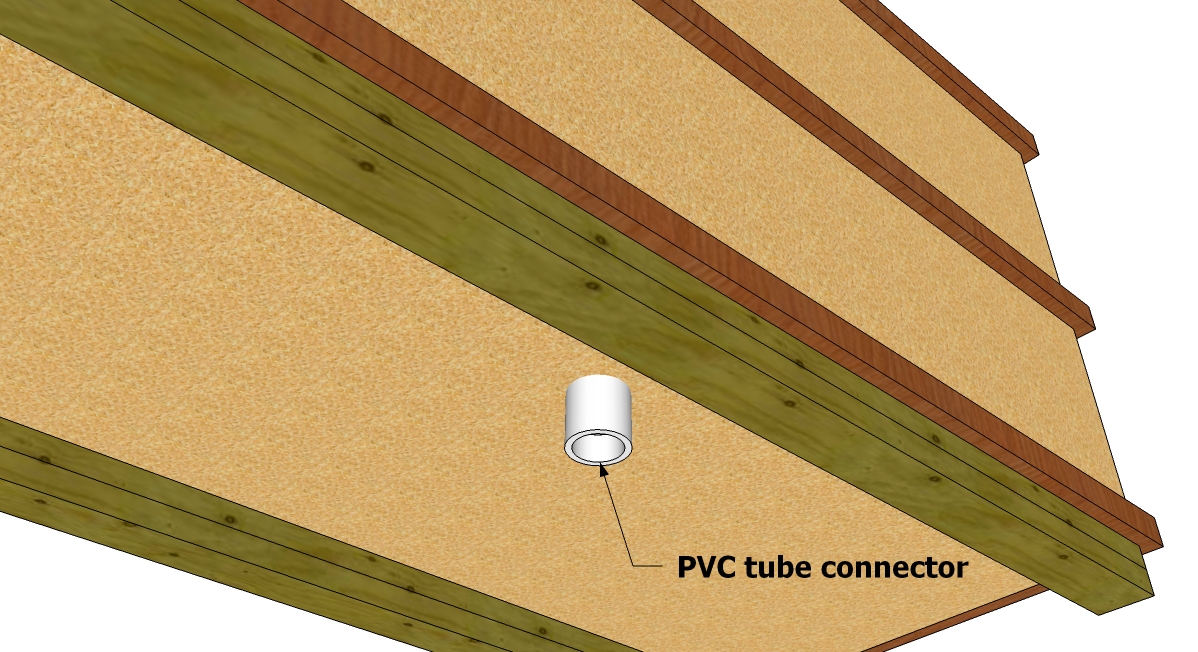
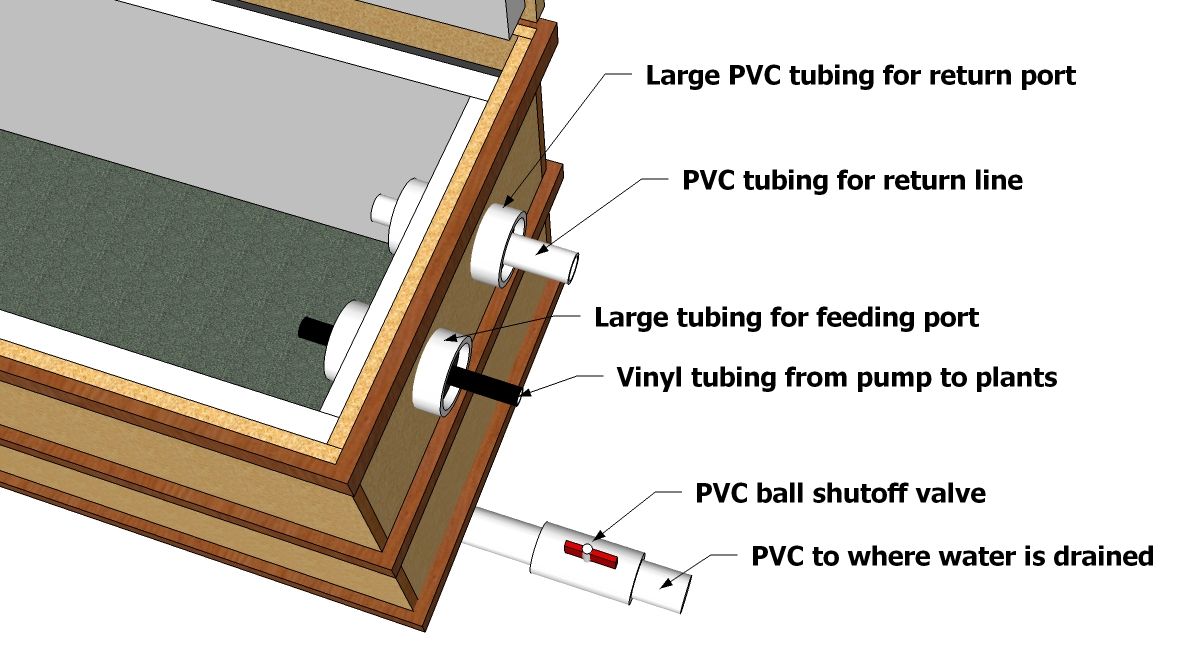
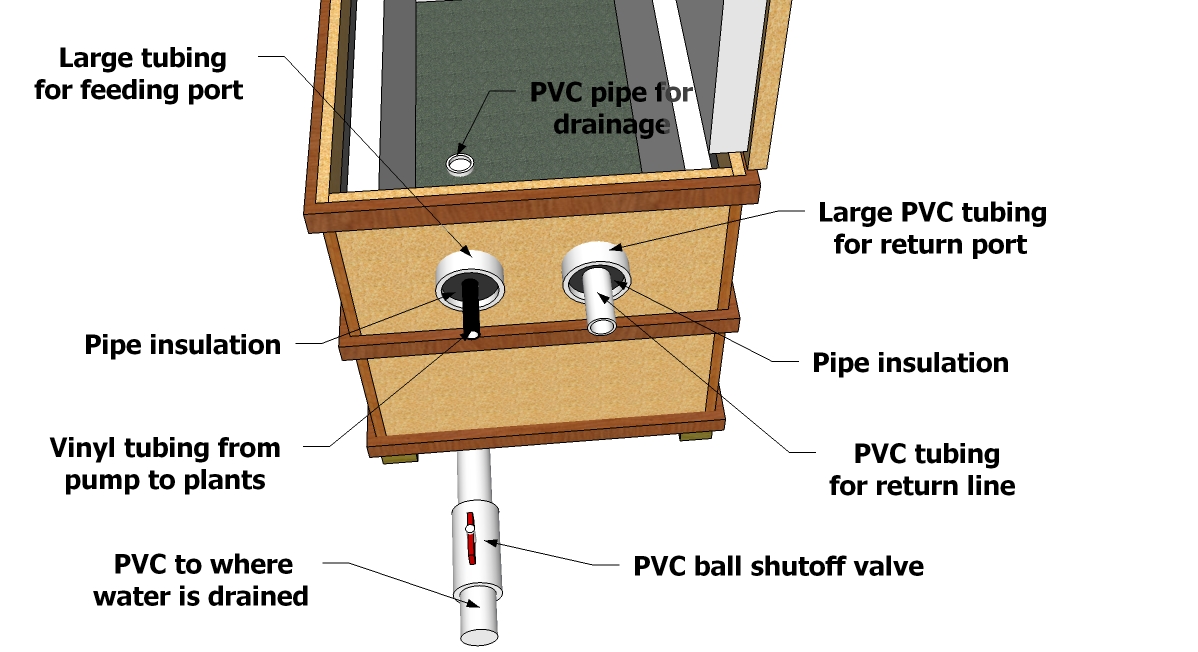
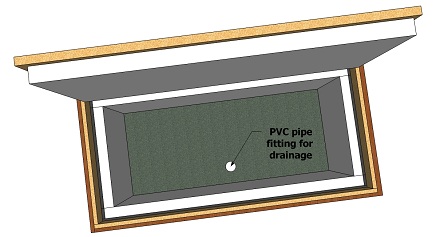
The first opening needed would be a drain at the bottom
of the box. Use a length of PVC tubing to make the bottom drain. Make
sure it's long enough the go through all the layers at the bottom of
the box witch will probably be around 3 to 3 ½ inches thick. Make sure
you make this piece of tubing is long enough that it extends out of
both the top, and bottom by at least 1 inch (1-2 inches would be
better, you can always cut it to size later). Now cut a hole just big
enough to inert the length of tubing into so it fits snugly.

Now
take it out and line the inside the of the hole you cut with a generous
amount of the Foamboard Adhesive, also apply the Foamboard Adhesive on
the outside of the tubing. Then inert the tube again and align it so it
extends out both the top and bottom correctly. Wipe the excess adhesive
away, and let dry. The part inside the box you will place a end-cap on
(make sure the endcap sits flush with bottom of the box), then drill
some holes so any water will drain out. Now you can simply change the
endcap to one with no holes in it to close off the opening completely
if you need to in the future.
At
the bottom of the box you will connect a PVC elbow and a horizontal
length of tubing that is long enough so it extends beyond the side of
the box. This will allow you to direct the draining water to anywhere
you want it to go.
I would not glue these sections of PVC
because they wont leak much if it all assuming you fit them tightly.
And you will probably want to have the flexibility to make changes in
the future, should you need it to drain to the other side later, or
move the box to different locations etc..

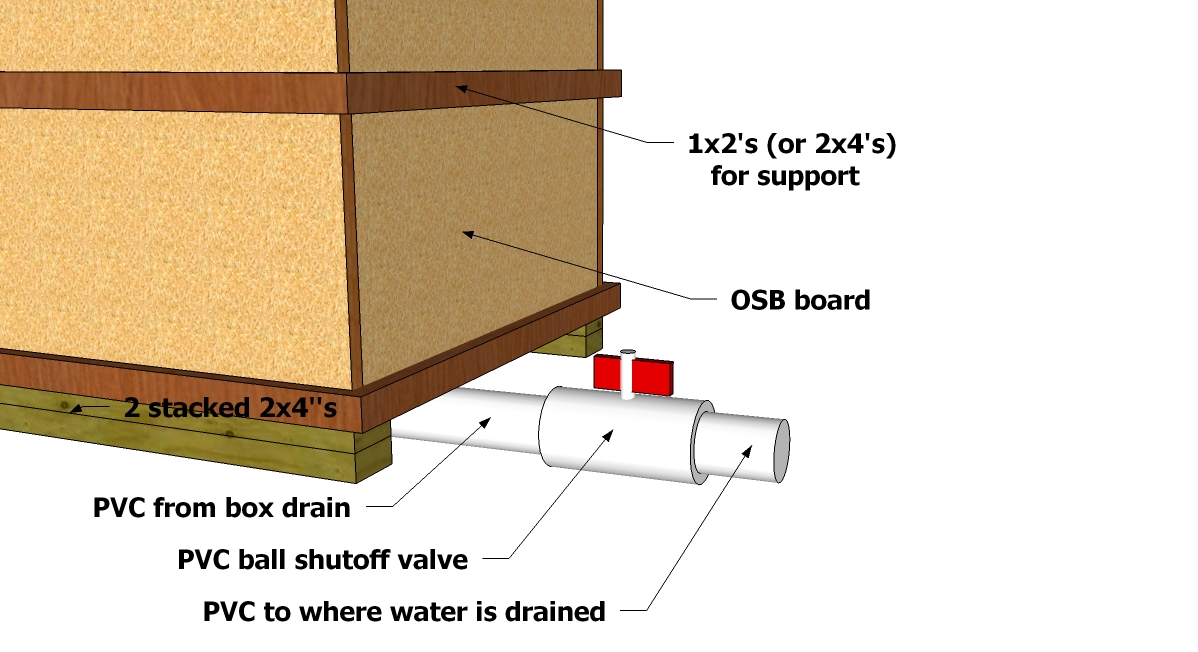
Now
you will want to be able to control the flow of any draining water.
This is easily done with a PVC ball shutoff valve placed in line with
the drain line. From here you can easily open or close the flow of
water from the box to get rid of any accumulated water easily. The PVC
line can be extended to anywhere you want to drain the water to. Like a
driveway, floor drain or even a bucket for watering the backyard plants
with.
Everybody will have different needs as far as running the
feeding and return lines to and from the box depending on the actual
reservoir, size of reservoir, how many lines needed etc.. I will show
how to create one set of feed and return lines so you get the idea. But
you will want to customize your box to your particular situation.
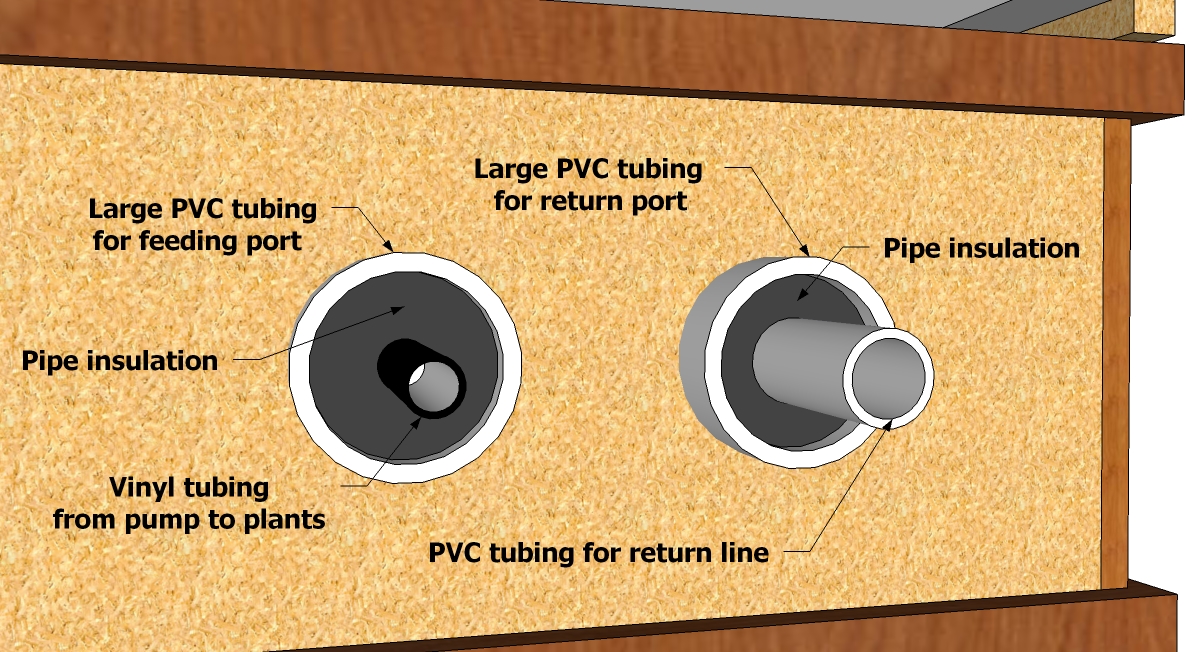
The
idea is to run the lines through the box without allowing any air in,
or out of the box. To do this it will be similar to the bottom drain
port but larger. Use a large diameter PVC tubing for the permanently
mounted opening. Then you can easily thread the feed and return lines
through it.
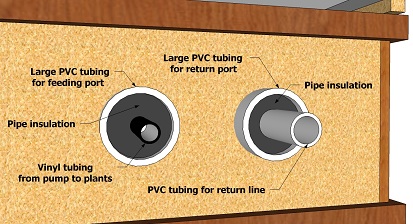
Make
sure large diameter PVC tubing will be wide enough to run the line/s
you need through the inside of the tubing, allowing enough room to wrap
the pipe/tubing with pipe insulation tightly. This will stop the cool
air from escaping the box, but also allow easy access for changes or
maintenance. You may need more than one layer of this insulation to
make a tight fit inside the tube. Once you have decided the size
opening you need, cut a hole just big enough to make a tight fit with
the tubing. Then cut a piece of the tubing long enough so that it
sticks out both sides of the box at least one inch, two inches would be
much better. This is so you will be able to fit a end-caps on once the
ports are permanently mounted. But I would measure the depth of the end
cap first to make sure your tubing will be sticking out far enough of
the box to fit a end-cap on both the sides. Then make it a ½ inch
longer for both sides to insure a good seal.

Now
you need to mount the large diameter PVC tubes just as you did with the
bottom drain port. Liberally coat both the inside of the hole you cut,
and the outside of the tubing with the Foamboard Adhesive. Insert the
tubing into the hole so you will be able to fit the end-caps later,
then wipe the excess away and let dry.
You can make as many of
these ports as you need. If you find you later don't need them all, you
can simply insert some bubble wrap into the opening and place endcaps
on both sides.

Measure
and cut a hole in end -caps for both the inside and outside of the box.
Just large enough for the PVC tubing and the vinyl tubing that will be
used for your feeding and return lines. Then place the end-caps on both
the inside and outside of both of your feeding and return ports with
the lines running through the holes you cut.
Now with the pipe
insulation tightly fit inside the ports and both sides caped off with
the lines running through them, you have a virtually air tight seal.
Now
you have the basic finished box. As mentioned before it wont have the
ability to transfer heat from your nutrient solution into the ground
(well at least not on it's own). But you can control the
temperature inside the box much easier than trying to control the

outside air temperatures.
There are many ways to cool the inside temperature of the box, thus cooling the nutrient
solution. The easiest and simplest is probably way would be simply drop a couple large blocks of ice into the bottom of the box.
The
cool water from the ice as it melts will keep your nutrient solution
cool, and like any ice chest the inside of the cooling box cool. Then
you can easily just open the PVC ball valve to drain any excess water
as needed.
Cooling your Nutrient Reservoir Cooling Box
Another
more elaborate way to cool the inside of the box, is to pipe in air
conditioning directly into the box. You can use the same technique as
you did to create the feeding and return ports, to create the opening
for a AC port. Then use the household ducting (and insulation) to
channel the air conditioning from the AC of the house directly into the
box, by either channeling it from a vent, or taping directly into a
duct line from the attic, or basement (if you have one). Just remember
to place an air filter in line where the AC enters the box, or you may
get a lot of dust inside your cooling box.
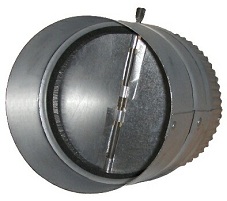
If
your cooling box is air tight (like it should be), you will want to
create a air return or vent. Because if there is no escaping air the
fresh cool air wont be able to enter the box because of pressure. You
can use a air damper like this one pictured here (to the right). This
will allow the air to flow in one direction only, keeping the warm air
from reentering the box when the AC system is not running.
Although
you will probably want to us a end-cap with holes in it on the outside
of this exhaust port, along with an air filter there to better restrict
the flow of any possible warm air from reentering the box during times
when the AC will be shut off for extended periods of time.
You
should also construct these vents so you will be able to disconnect
both the damper, and AC inlet connections easily from the ports you
created for them. Then once disconnected you can seal them the same way
as the other ports by filling it with bubble wrap, and then placing
end-caps on both sides. That way if you decide to move the box, or it
becomes winter and you don't need it any more, you wont have any
problems with using your insulated box because you don't want it
connected anymore.