Because prices change from place to place, your
exact cost is going to
be determined by what you can get in your local area. But you
should be

able
to
acquire all the materials needed for under $100. I built this
system myself for between $60 and $80. You may even already
have some of the needed materials around the house.
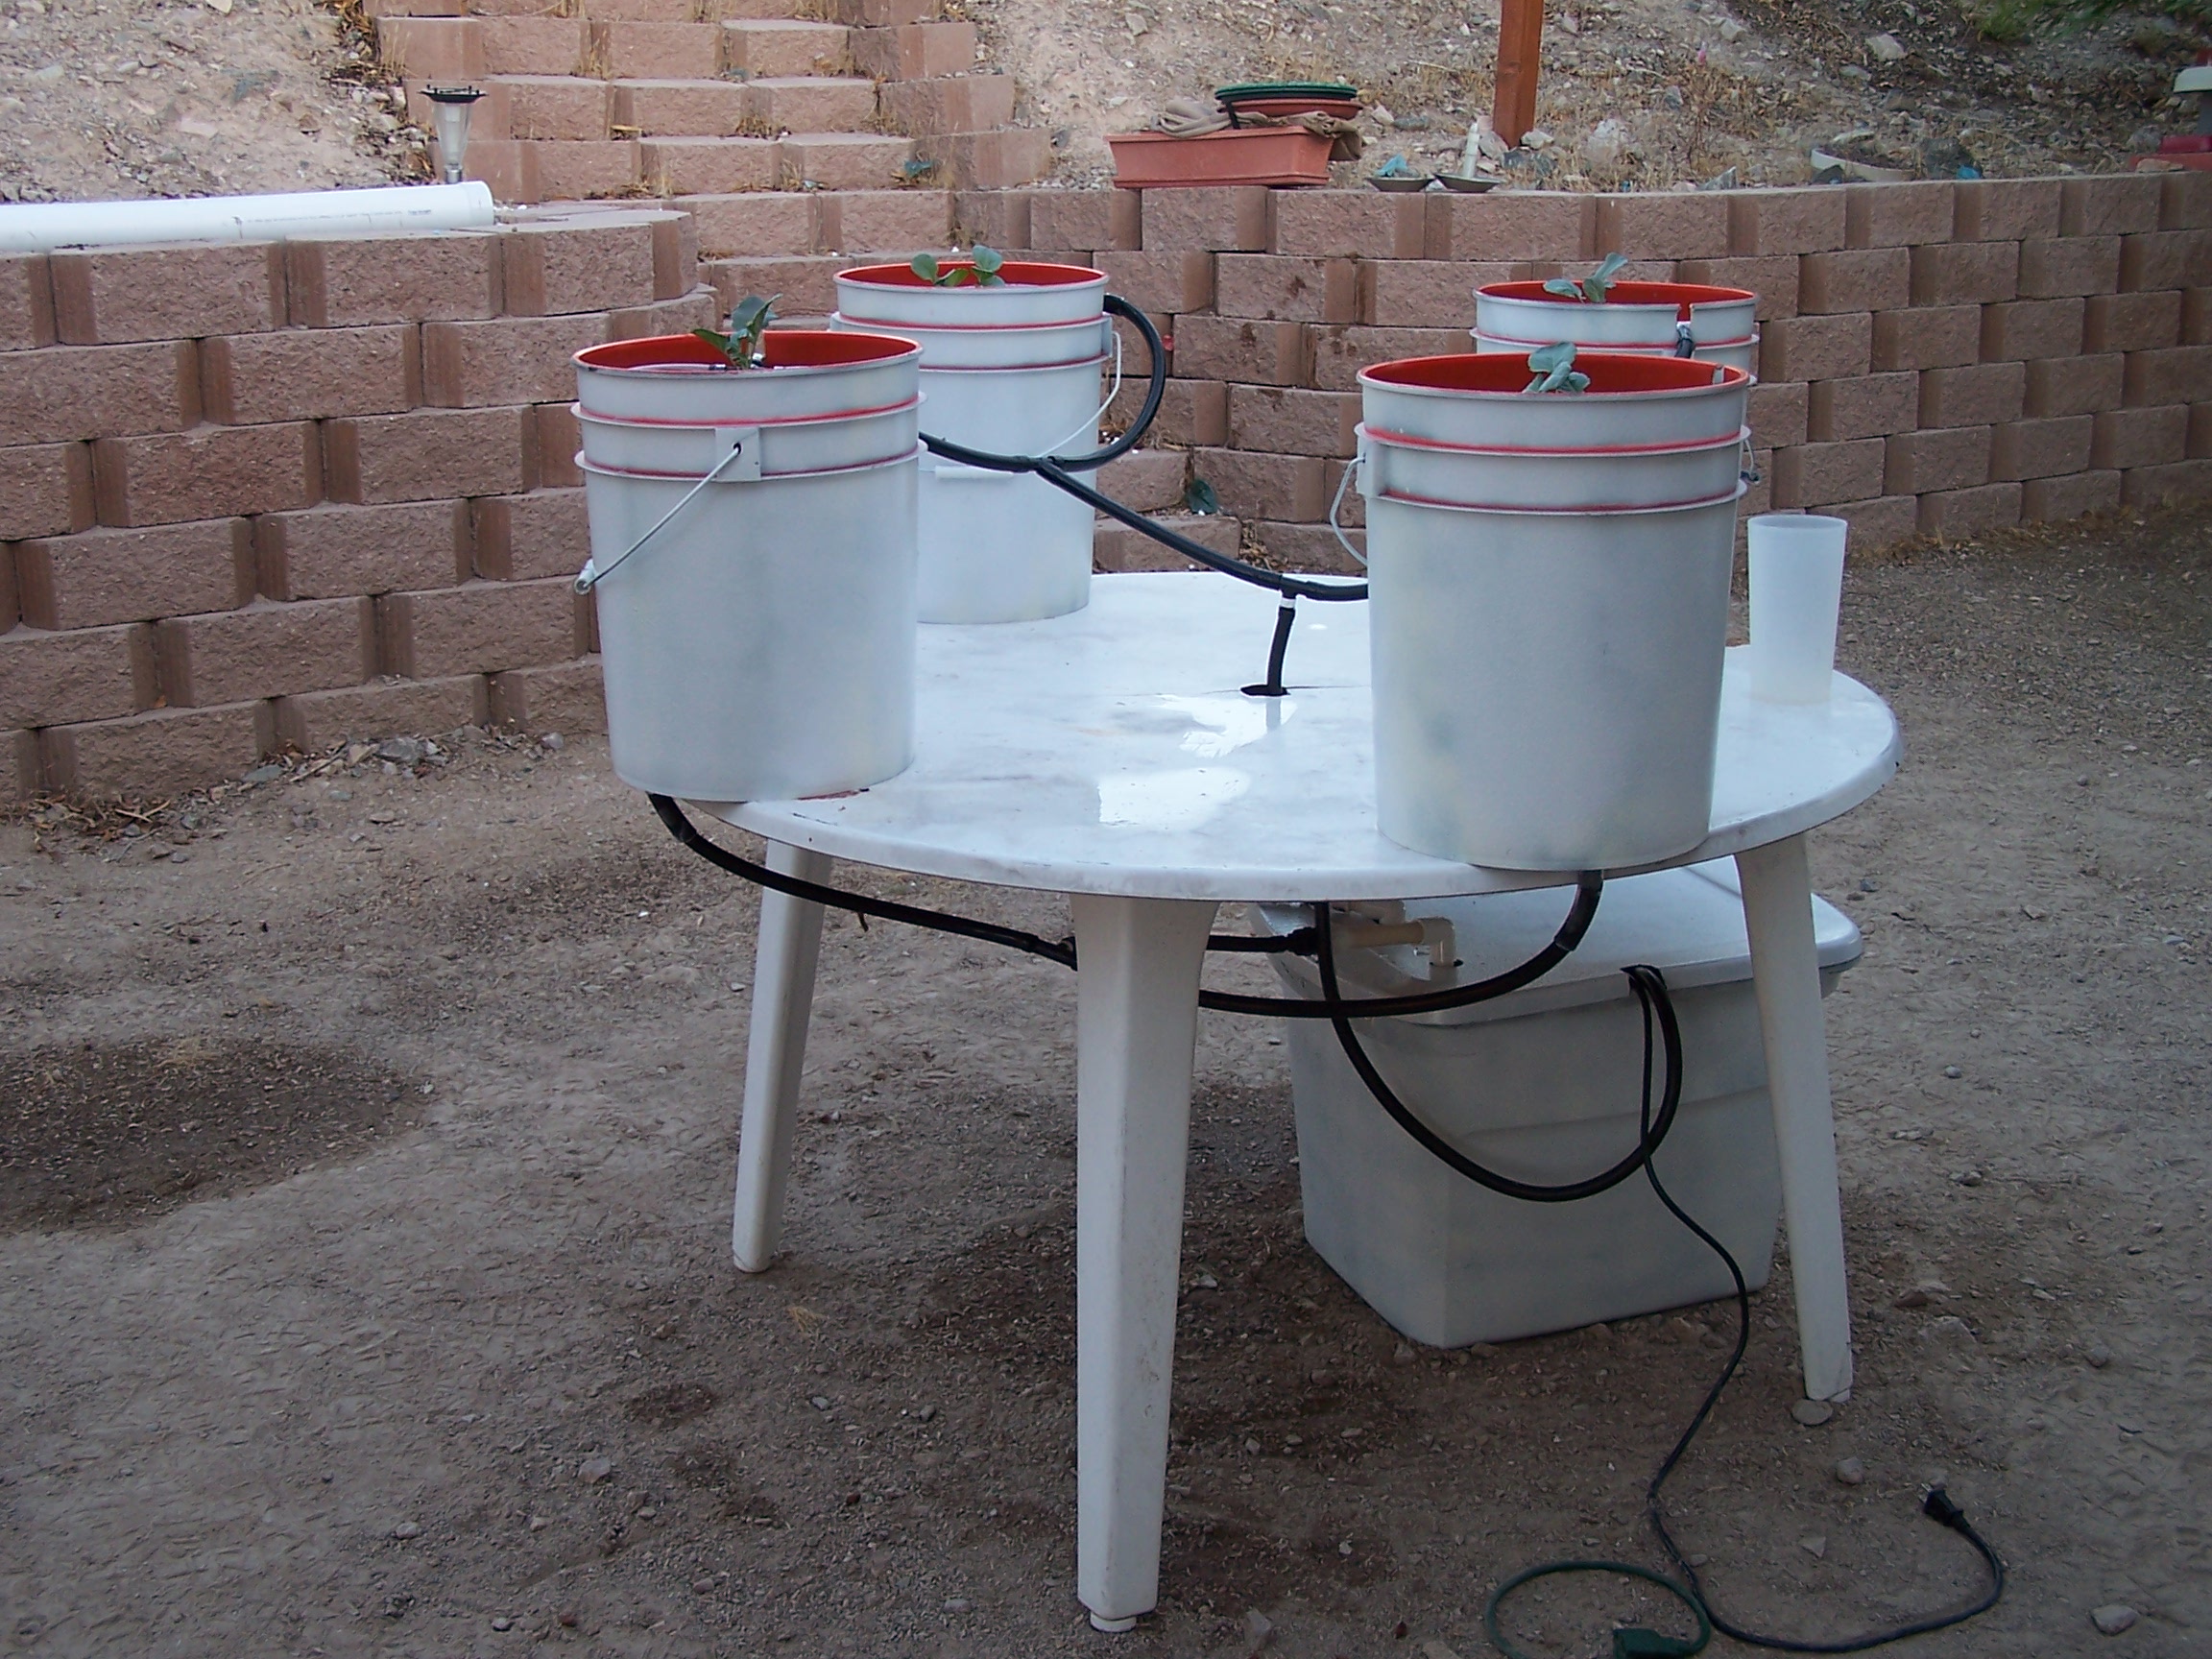
Even though this system
is designed to grow 4 plants in 5 gallon buckets, you can easily adapt
it to grow more or less plants as you wish, as well as in larger or
smaller containers and buckets.
System
Parts List
- 4 Five gallon buckets (for plants)
- 4 Through holes (also called bulkhead fittings)
- Black vinyl tubing (for both fill and drain lines), also
blue vinyl tubing from a
hydroponic supply shop will work fine as well.
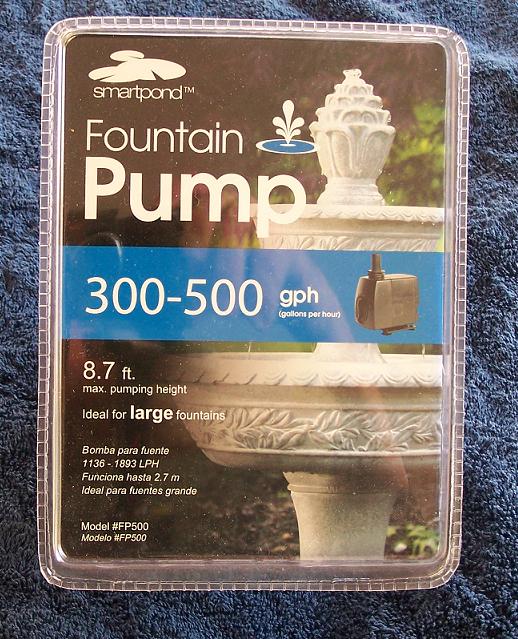
- 1 Submersible fountain pump (found in most nursery's)
- 18 to 30 gallon storage tote for reservoir (larger is
better in the long run)
- Hydroponic growing medium (to support plants and hold
moisture for the roots)
- One inexpensive furnace filter (to keep growing medium from
getting in the tubing)
- A Few “T” Connectors that Fit the Vinyl tubing your using
(how many depends on your
final configuration)
- Two cans of inexpensive black spray paint, and two cans of
Inexpensive white spray
paint (in order to light proof the buckets and reservoir)
- (Optional) A small amount of PVC tubing and connectors (for
return line ends)
Additional
Items You'll Need to Grow the Plants
- Hydroponic Nutrients (any type, as long as there designed
for hydroponic plants).
- pH test kit (to test pH of the nutrient solution) pH drops
by General Hydroponics works best and is the cheapest way to go.
- pH Adjusters (pH up, and pH down) That's to adjust the pH
if needed once you have
tested it.
Except for the hydroponic nutrients, pH testing kit, pH adjusters and
growing medium, you
should
be able to get the rest of the materials needed at local stores like
Home Depot, Lowe’s Wal-Mart, Target, Big lots, Kmart etc. I got the
five gallon buckets at Home Depot for about $2.50 each, and the 18
gallon storage tote at Wal-Mart for $3.50. The black vinyl

tubing and “T”
connectors, I got at Lowe’s.
The
fountain pump was from Lowe’s as well. That was the most expensive part
of the whole system. The pump was about $40, but for this system you
don't need a pump as large to do the job, but it does allow you to
expand on the system in the future. Just make sure any pump you use has
a removable filter, If not you will want to create one to keep debris
out of it.
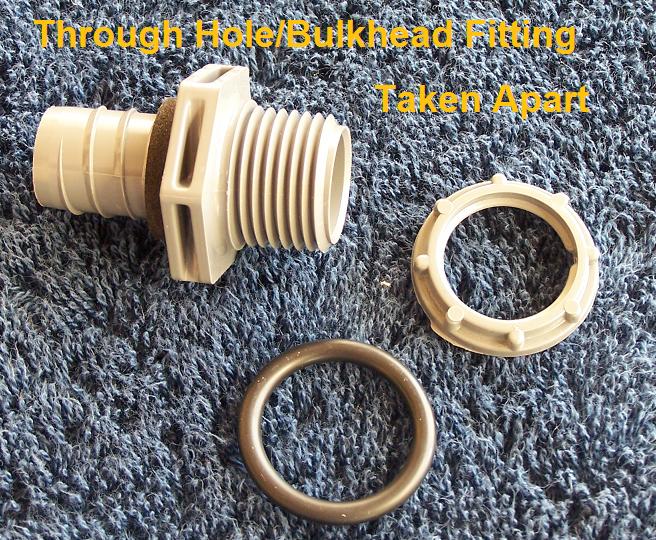
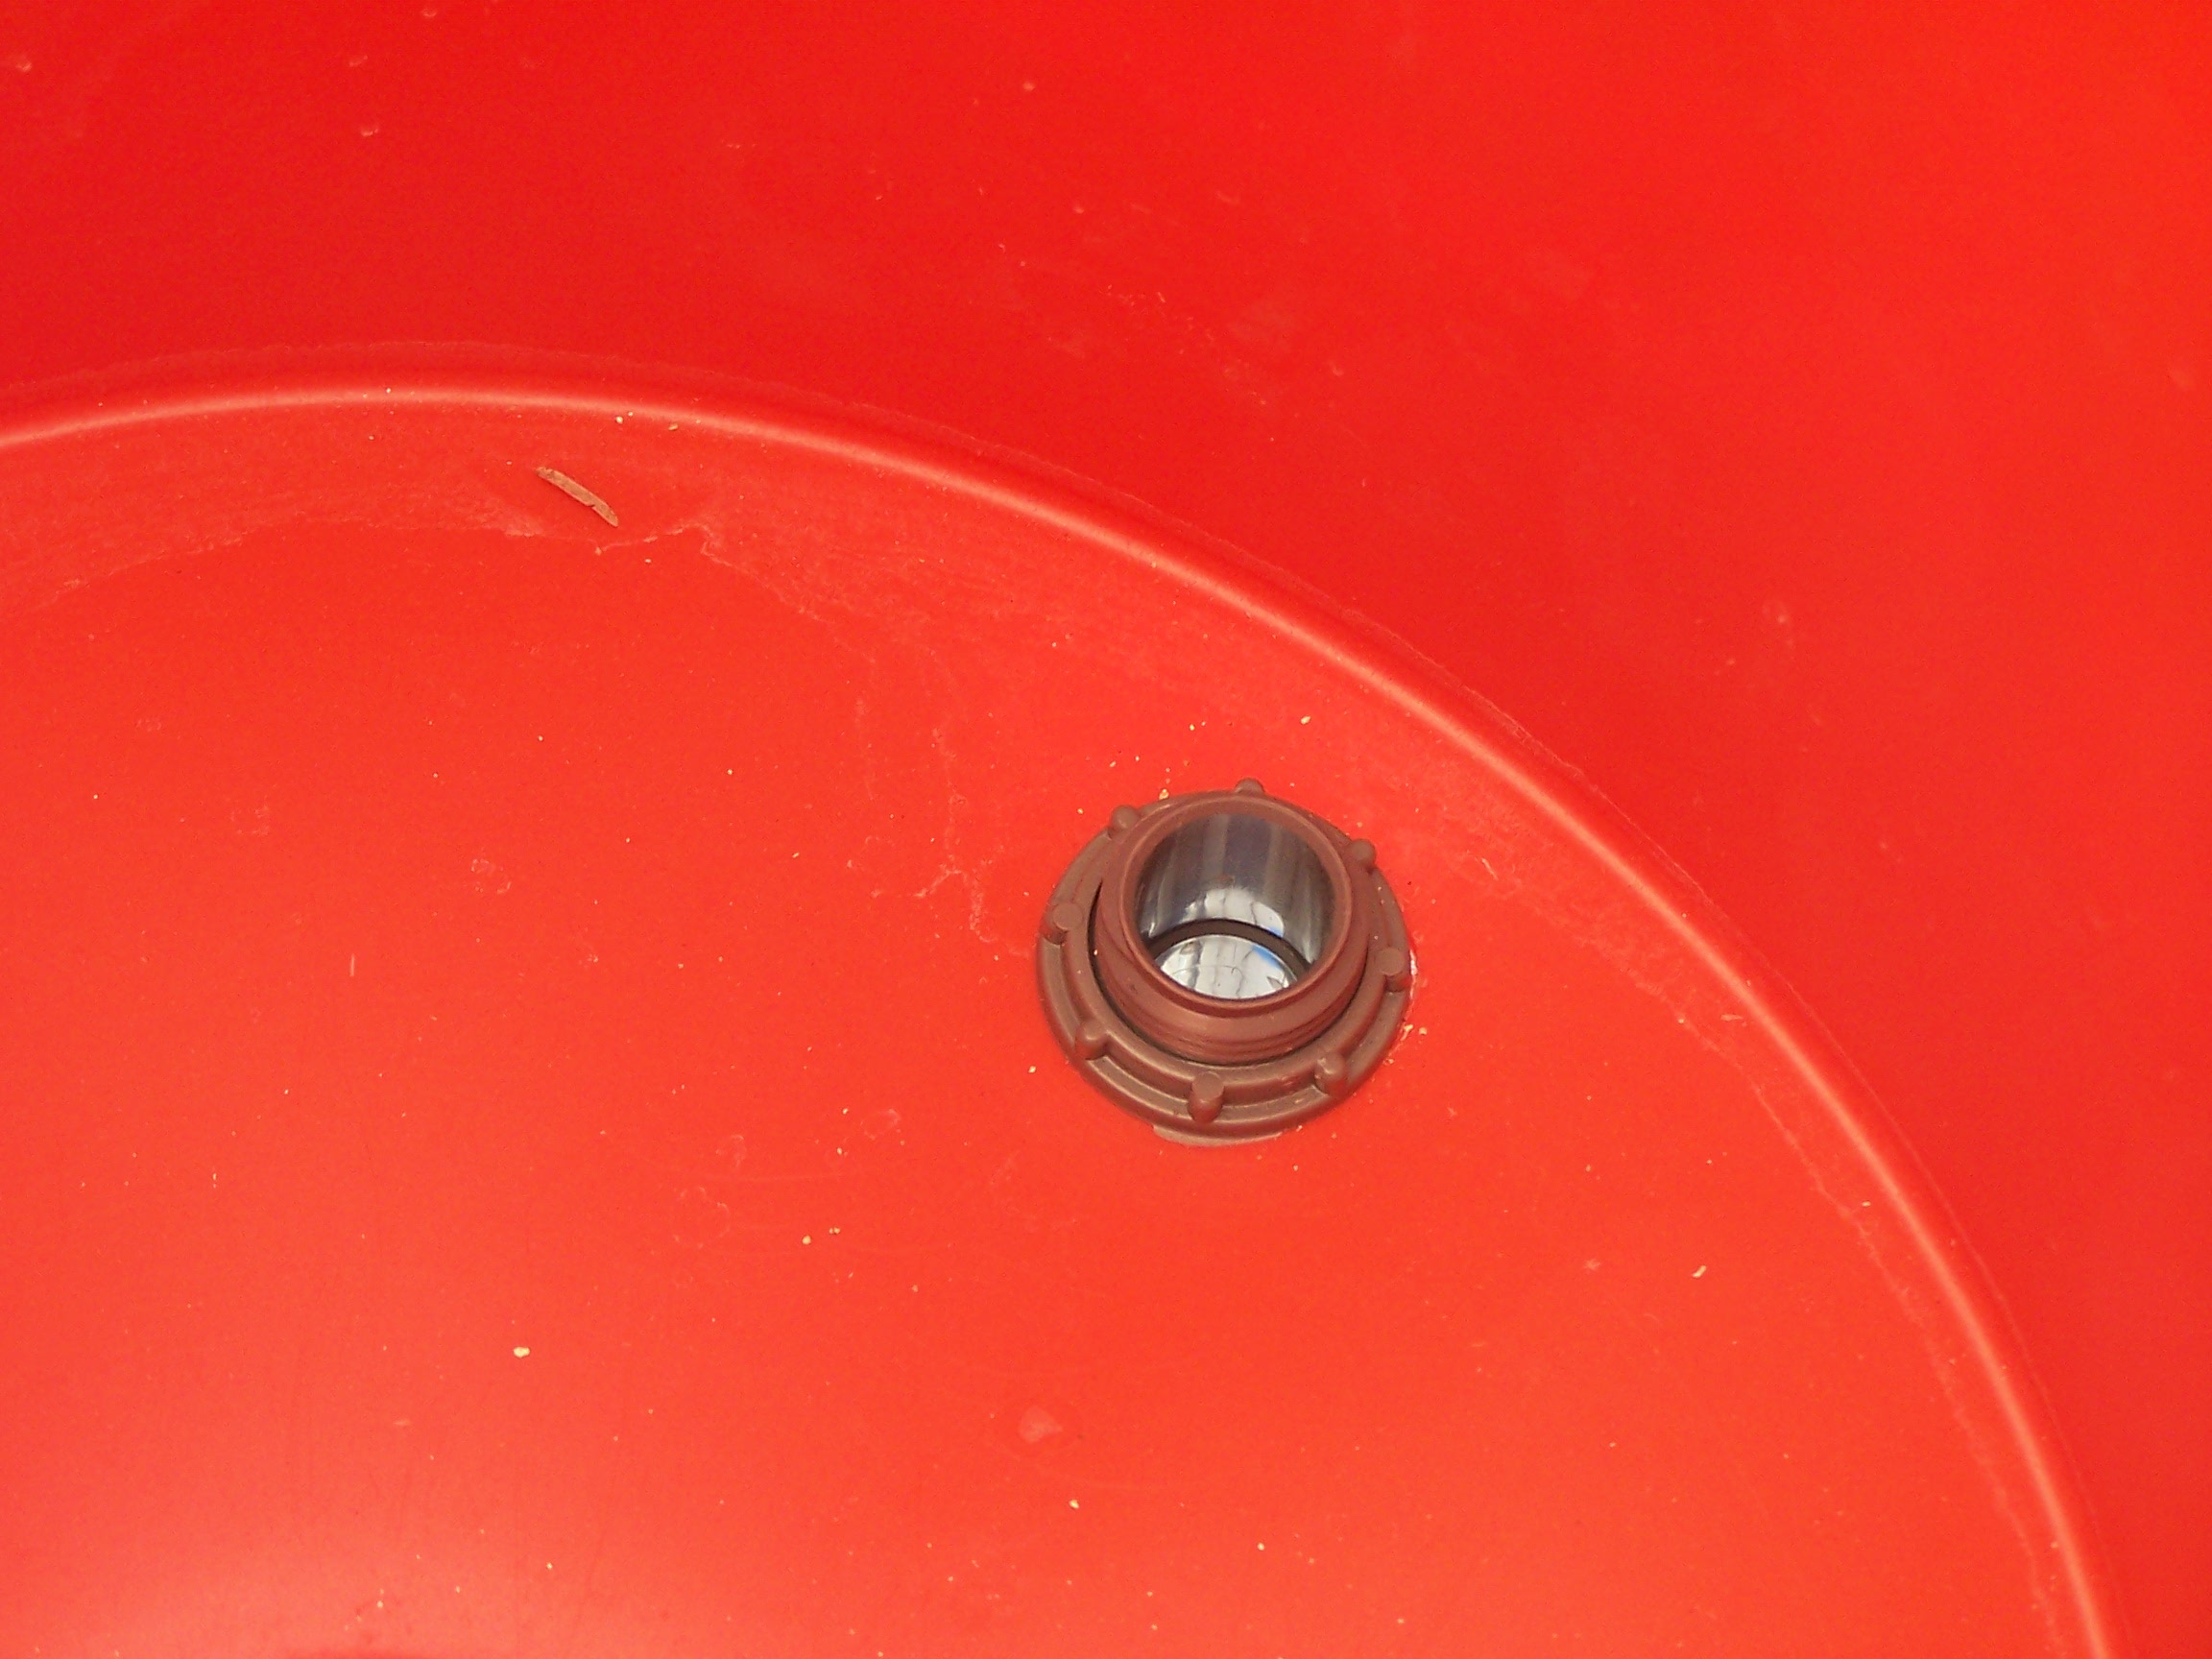
The Through holes/Bulkhead fittings come in all sizes
and shapes. They are used in all sorts of industry’s, but most home
improvement stores carry them somewhere in the store, and very likely
to have them in more than one place. I got these in the electrical
department at Home Depot for $1.97 ea, right next to the electrical
conduit.
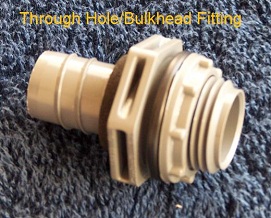

You will need to make sure the end of the
through hole that the vinyl tubing will go on
(end
without the threads and nut), will fit the size tubing you are using.
The ones in the pictures above will fit 5/8 inch inside diameter
tubing. If not you can use two sizes of tubing and/or using a hose
clamp to tighten it up. Or by cutting a short piece of tubing (the size
that fits the through hole), and slipping it on the through hole, then
slipping the smaller tube inside the larger one. If so you may want to
use a small amount of waterproof glue between the two different sizes,
and/or a hose clamp to make sure there's a water tight fit. Also you
may find that a old garden hose will fit just fine, and can be
substituted for the vinyl tubing for the return (drain) lines.

First
step is to trace the side of the through hole with the thread and nut,
on the bottom of all 4 five gallon buckets. You'll want it to be close
to the edge of the bucket, but not so close you wont be able the thread
the nut on in order to install it (about an inch). That's so you will
be able to set it upright on a table or bench, and most of the buckets
weight will still be supported, and it wont tip over.
It's
important that you don't make the holes too big, or it may leak. It
should be just big enough to stick the threaded side of the through
hole in without a noticeable gap.

I
use a rotary tool to make the holes myself, like the one pictured on
the right. If You don't have one you can make the holes any way you
want, even a hot metal coat hanger will be able to melt the plastic
nicely, then just scrape any burs off with a razor blade to make the
edge smooth.
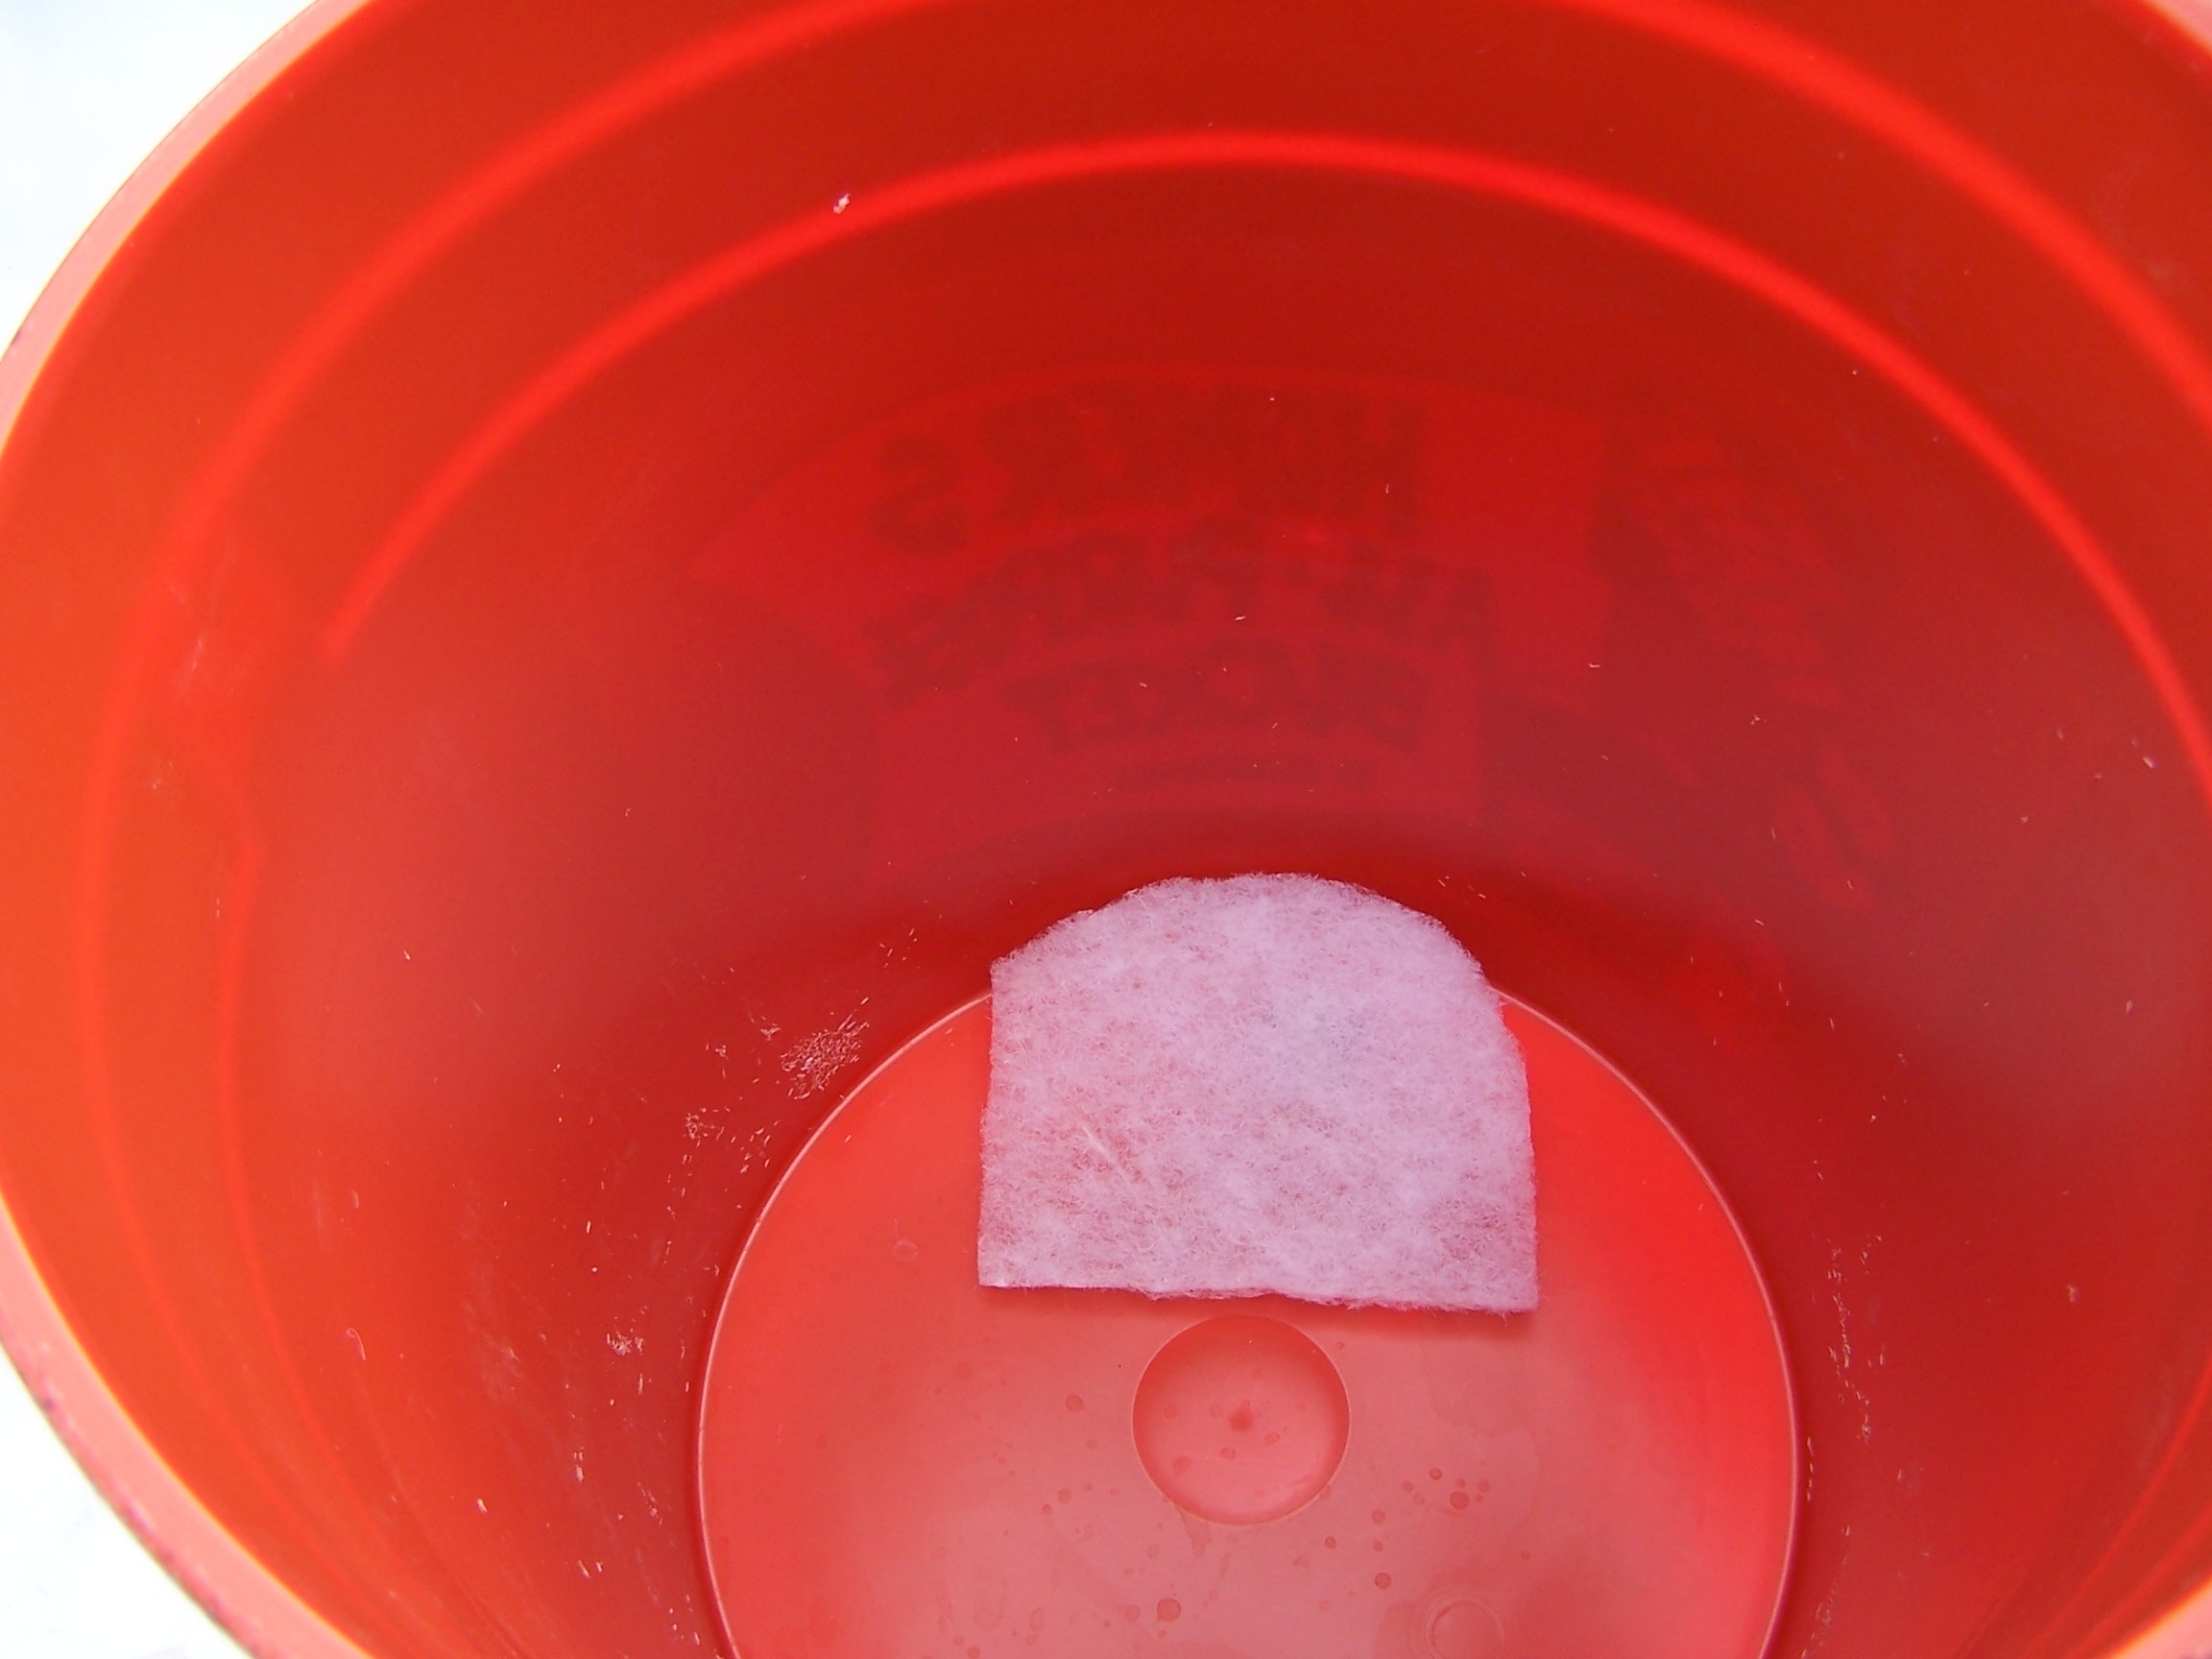
Now that you have the whole cut, insert the
through
hole and tighten it up. Just make sure you have the rubber gasket on
the right side, in most cases (depending on the particular through
holes your using) it will most likely be on the outside of the bucket,
and only the nut on the inside.
In order to keep algae growth
down you will need to light proof the buckets. Algae needs two things
to grow, food and light. The nutrients will provide plenty of food, so
you need to block the light.
Turn the buckets upside down,
and put tape all around the through hole (so you don't get paint on, or
in it). Give the buckets a couple of coats of black spray paint, or as
many as needed to block all the light. Then because the color black
absorbs heat, give the buckets a couple of coats of white spray paint.
This will reflect light and help keep the root zone temperatures from
getting hot. Make sure you only paint the outside, you don't want paint
to come in contact with the roots or nutrient solution.
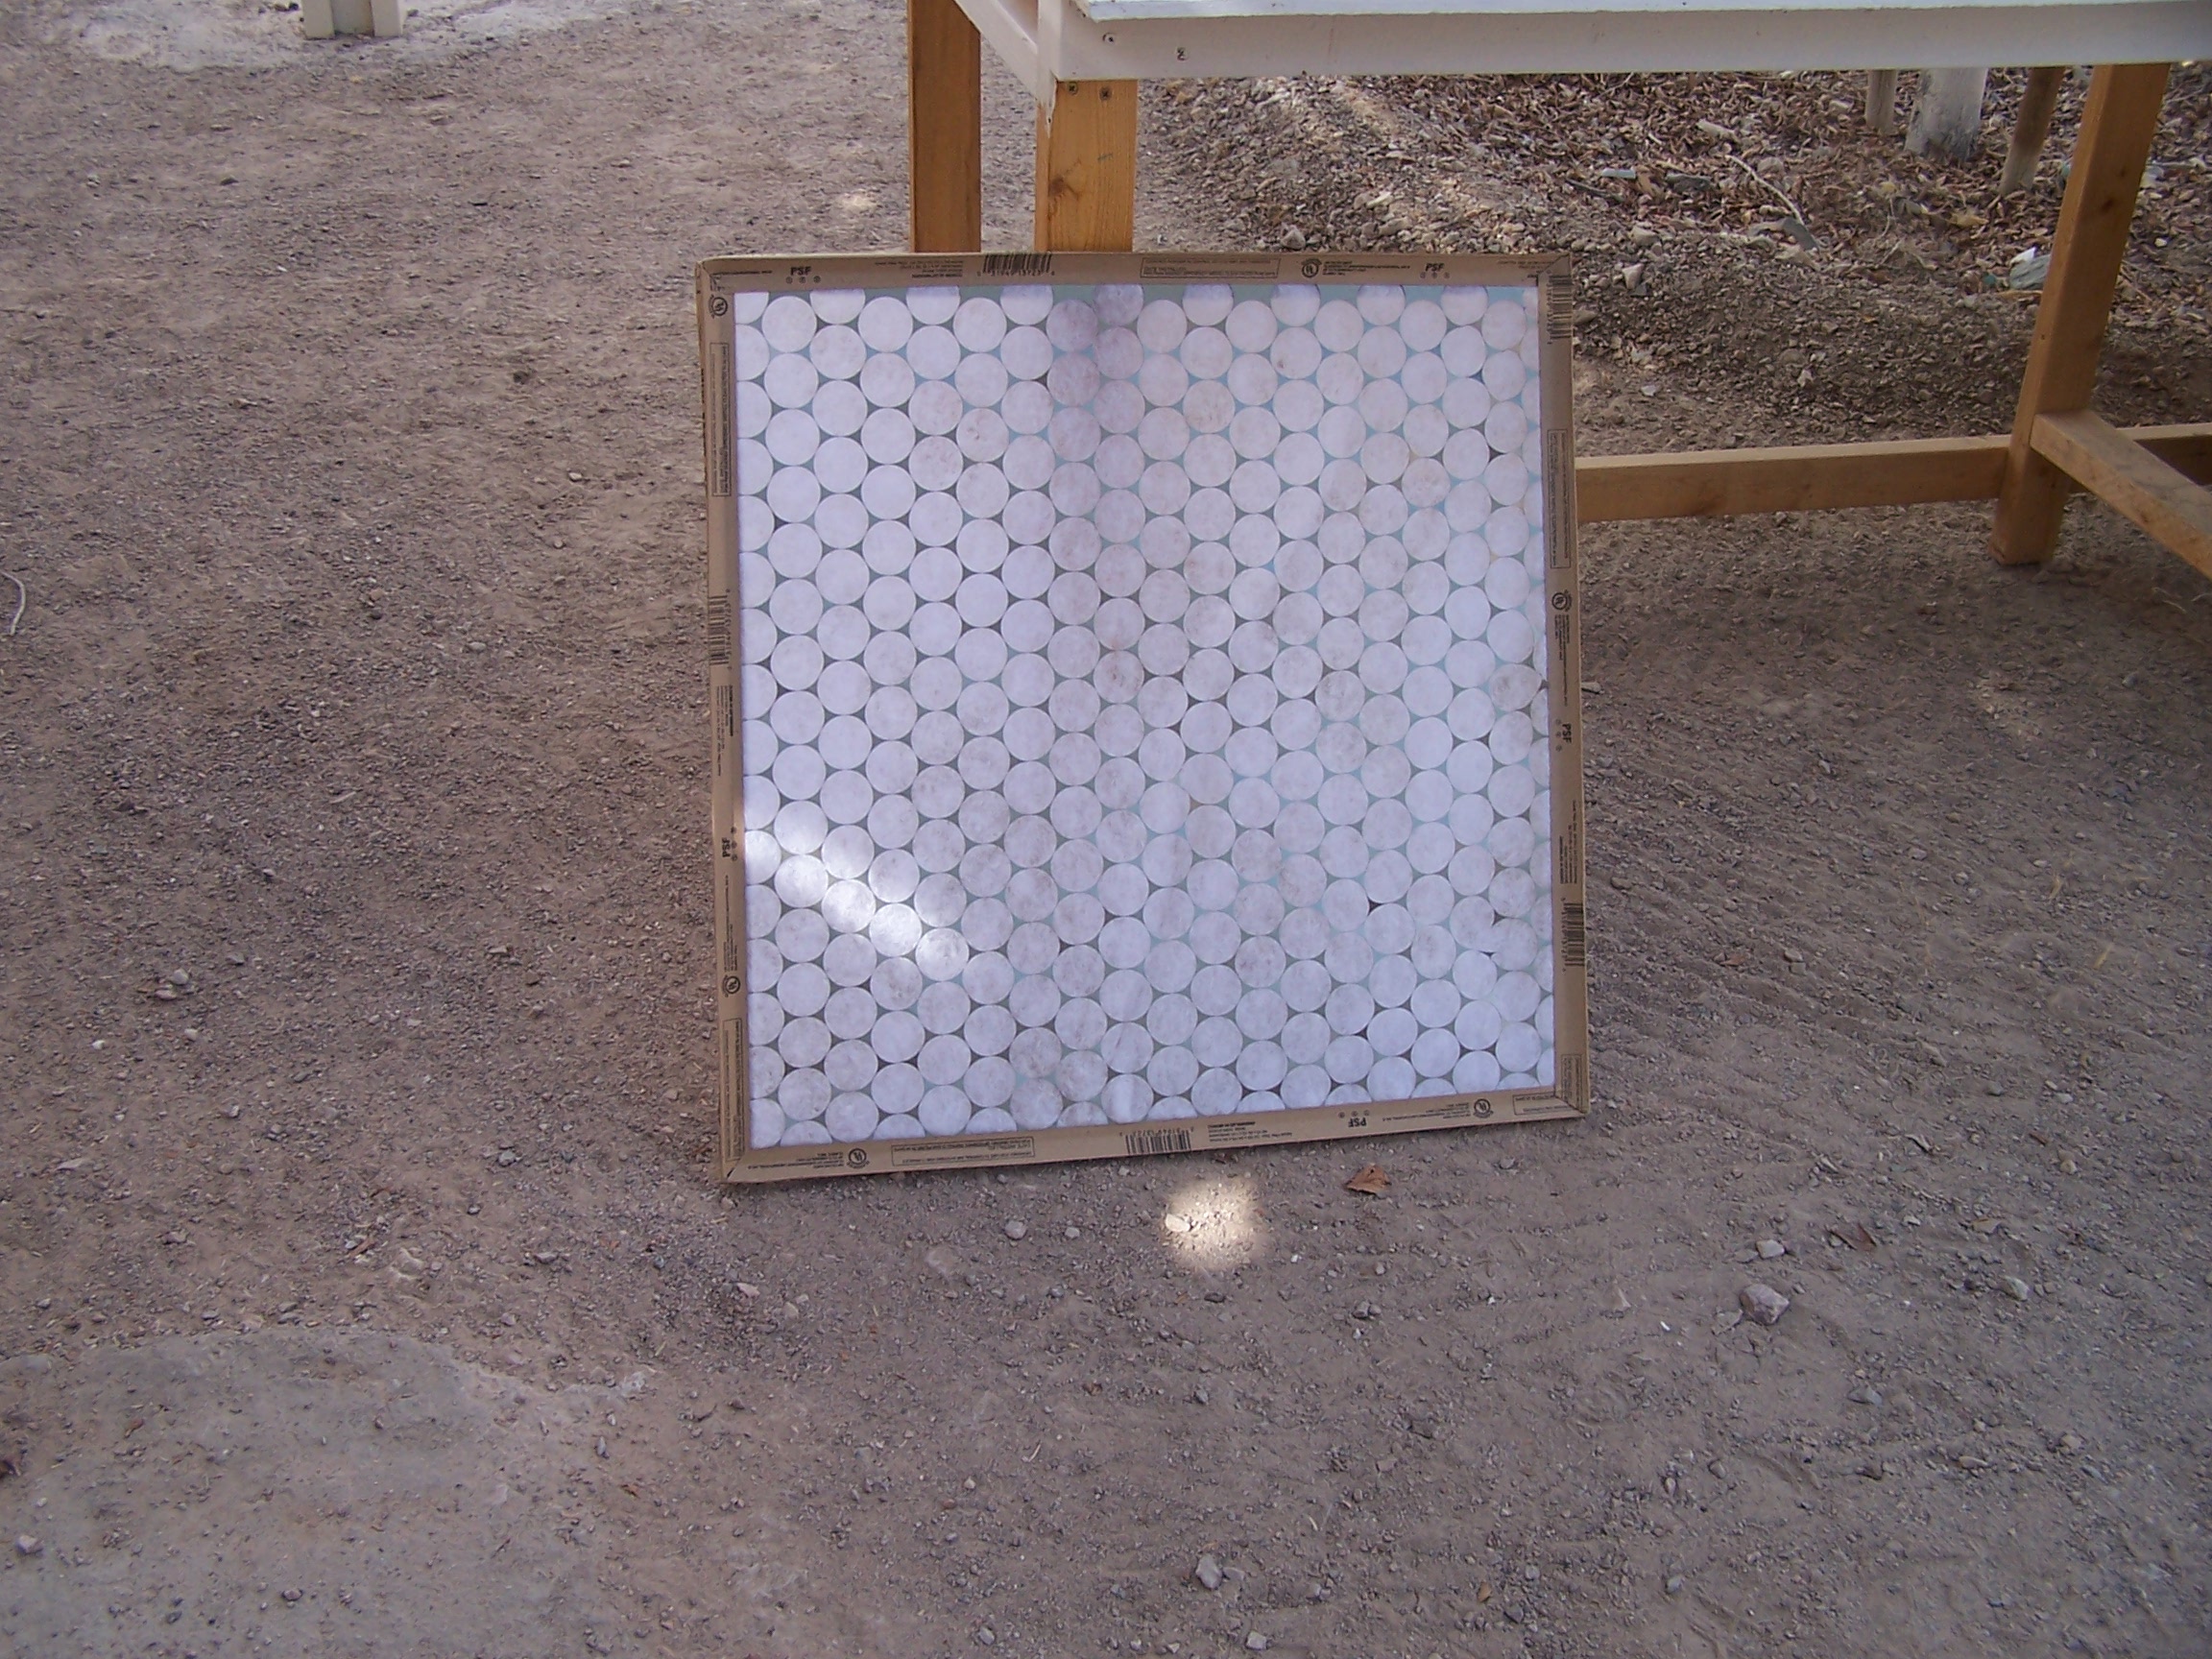
Getting
the buckets ready to put the plants in is also quite simple, but just a
few steeps. First cut the filter part out of the furnace Filter, then
cut a piece off to place over the through holes. This will keep the
growing medium out of the tubing, but still allow the water to flow
easily out the bottom.
Furnace
Filter


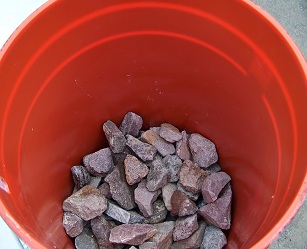
Now
that you have the filter in place, place
some
rocks on top of that. I would fill about the bottom third with rocks.
This holds the filter in place, as well as helps water drainage from
the buckets. Also the rocks adds weight to the buckets keeping them
firmly in place. Even strong winds won't be able move them.
Note: be sure to clean and sanitize the rocks
first by rinsing them off and soaking them in
bleach water for about an hour, then rinsing
again. This reduces the chances of any root
diseases from soil born pathogens getting into the system.
Growing
Medium
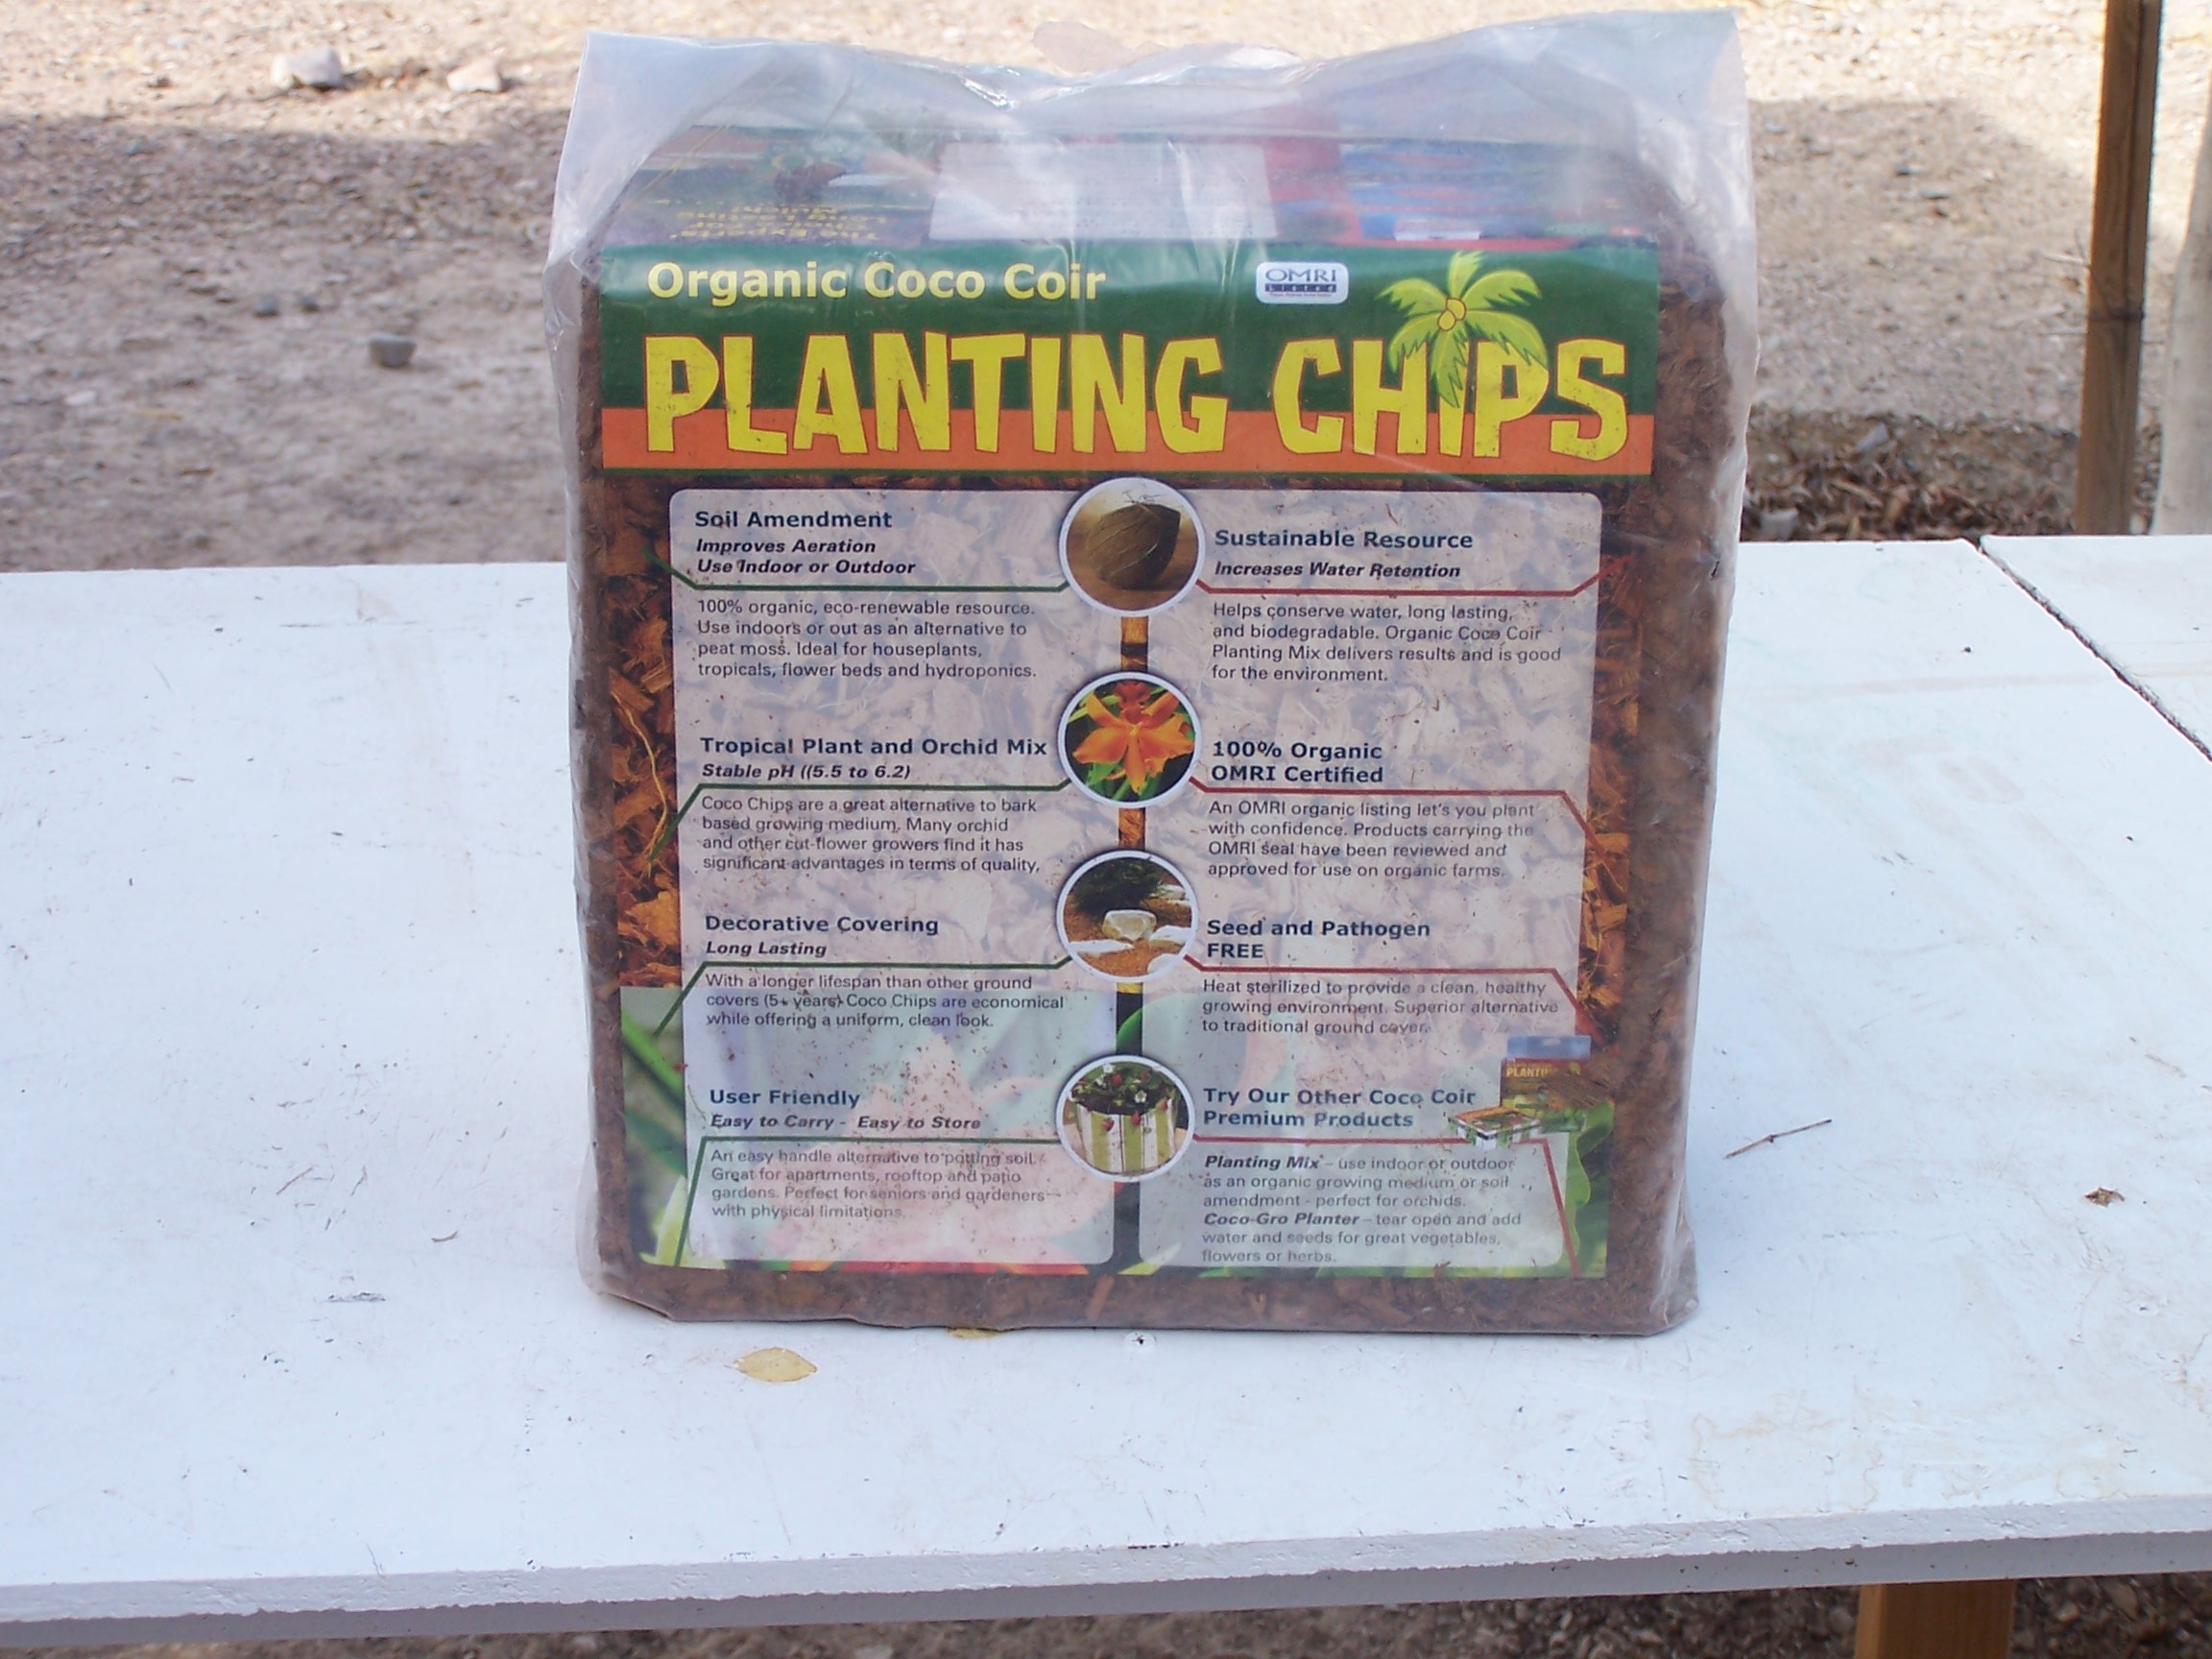
On
top of the rocks place the hydroponic growing medium. You can use many
materials as a growing medium like Grow Rock (Hydrocorn), Perlite,
Vermiculite etc.. Any inert (without
nutrients) material can be used. I especially like, and used coco chips
in this system. Coco
chips and coco fiber are Basically the same thing, but coco chips are
just in a larger partial
size. The larger partial size allows more air/oxygen to get to the root
system.
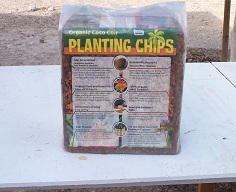
These
are the coco chips I used in this system, they come in a compressed
block. This block equaled 2 cubic feet (about 15 gallons worth) when
uncompressed. To uncompressed it you just soak it in water. I would do
this a couple of times to leach out some of the color. The color wont
hurt the plants, but I try to get out as much color as I can first
anyway. These coco chips also hold moisture very well witch is another
reason I like using them. This block cost me $9.95, and was enough for
all 4 five gallon buckets.
Watering
and Drain lines

Now make a loop using the vinyl tubing and a connecting “T” for all 4
buckets. These will be
the dripper's that will water the buckets. Once you have made them,
take a paperclip and heat one end up with the flame of a candle, then
poke some holes in the tubing ring with it.
Notice that I cut a notch in the side of the buckets just large enough
to hold the watering line in place snugly.
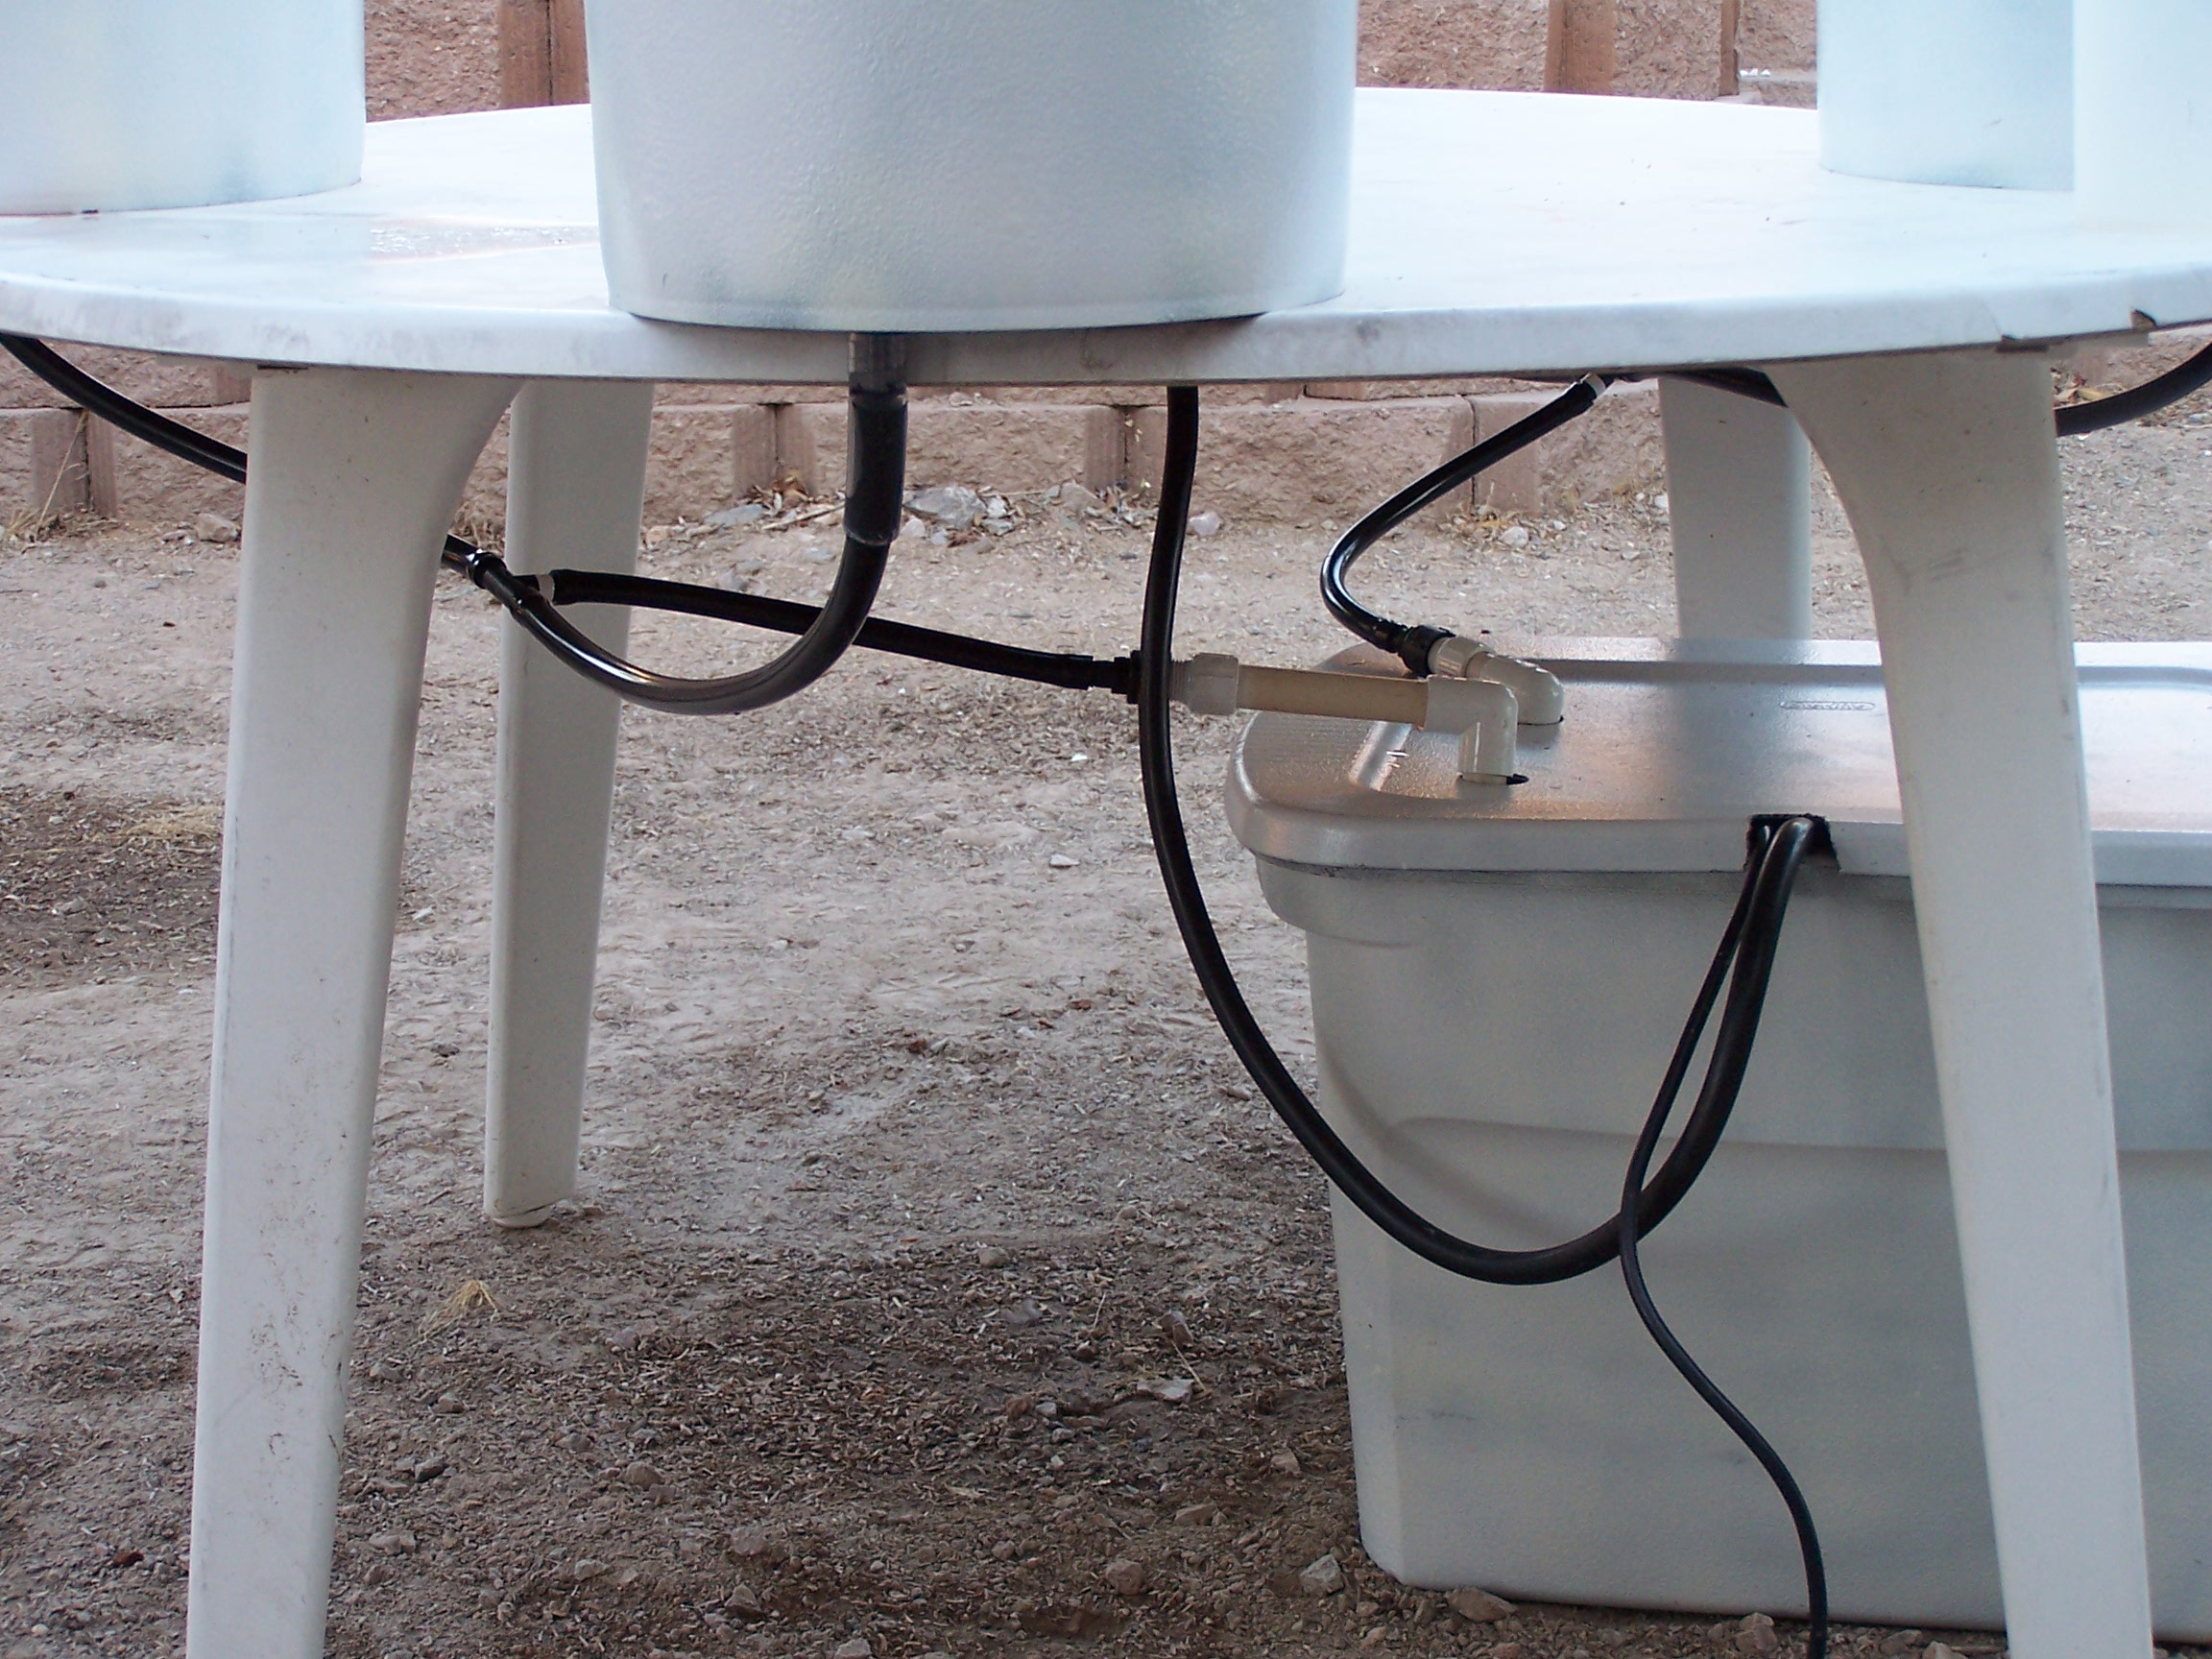
The the feed line (watering) , as well as the drain line setup will
depend on the configuration
and
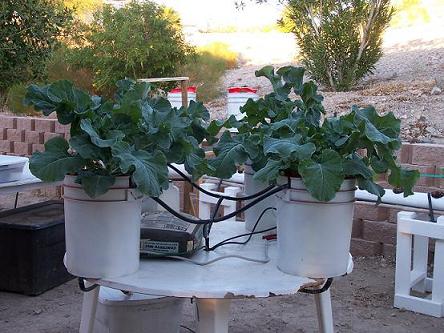
positing of where you place your buckets. In the picture below you can
see how I have run the lines to my buckets on the tabletop. The feed
line comes up through a hole in the center of the table. Then is split
into 2 lines using a “T” connector, then each of those lines is split
into two lines again using the same “T” connectors. Essentially
splitting one feed line into 4 separate lines (one to each bucket).
As
the nutrient rich water is pumped up to the top of the plants, it then
drips down through the buckets, moistening the growing medium (and
roots), then freely drains back down into the reservoir through the
through holes at the bottom of the buckets. Once back in the
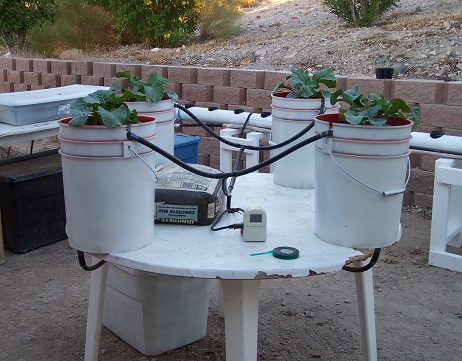
reservoir, it's able to be recirculated through the system again. The
bag of concrete is just there to help add weight to the table, we get
50+ mile an hour wind gustsfrom time to time,
but I never had any
problems with the table or buckets wanting to tip over with the weight
of the rocks in the buckets as well as the concrete bag on top of the
table.
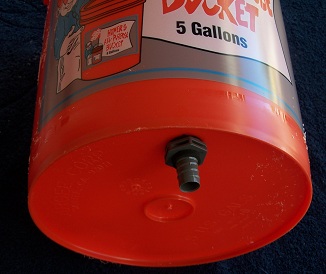
The
reservoir
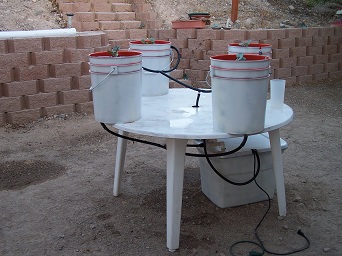
The
reservoir part is quite simple too, just paint the base and lid
(outside) of the 18 to 30 gallon storage tote the same way you did the
buckets. Painting it black to block light, and then white to reflect
light. Once painted, cut a notch in the lid for the electrical cord and
hose from the pump to go through. Then you are ready to start setting
up your hydroponic system.
There are so many configurations that you can do, there is no way to
explain them all. The
buckets
can be setup on a table, bench, wall etc.. But the one thing that you
need to be sure of is that the reservoir is at least 6 inches below the
buckets. Otherwise the nutrient solution wont be able to flow back into
the reservoir easily.
The design is simple, the pump pumps the
nutrient solution up to the top of the buckets, where it drips down
through the bucket, and out the through hole at the bottom. Then the
return tubing drains it back into the reservoir.

You
can run the return lines different ways, but it should be a gentle
slope all the way back to the reservoir. You can see that I connected
the return lines from two buckets together with a “T” connecter, then
back to the reservoir. The PVC at the end of the line going back into
the reservoir is not necessary, although it does help keep the flow
draining back more
even. The tube coming out the side of the
reservoir and looping back up through the center of the table is the
line that pumps the nutrient solution from the pump up to water the
plants
from the top drip rings.
Water
Cycling
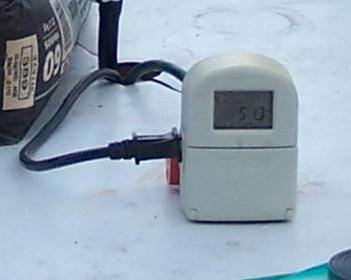
I used a digital timer with
this system (I already had it), but I later got another one for a
different system for $5.95 at Kmart. It had plenty of settings and even
a cover over the dial.

For
best results with the timer, make sure it 's rated for 15 amps (usually
called heavy duty). I had one that was rated for 10 amps but it burned
out in just a few days. The heavy duty (15 amp) timers haven’t burned
out in over 2 years now.
You'll also want a timer that
has pins for the on/off cycles all around the dial, not just a few (for
analog timers). That's because it will need to be turned on and off
many times during the day (to be explained later). Digital timers
usually have many on/off cycles that can be set, though if there is a
power outage it will loose their memory if it doesn’t have a battery
backup.

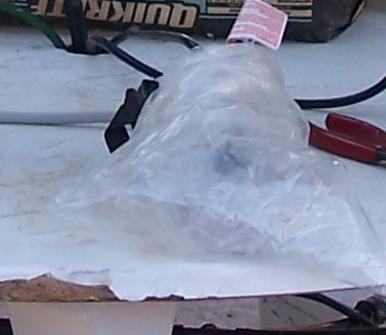
When
growing outside, you will want to make sure the timer and cord
connections don't get wet or they will short out. This can be done by
placing them in a spot that wont get wet even if it's windy and rains
hard. In my case I warped 3 plastic bags, layered one on top of the
other (in case of small holes). Then tightly duct taped it to the
cords. It's not as pretty as it can be, but it kept rain off the
connections just fine.