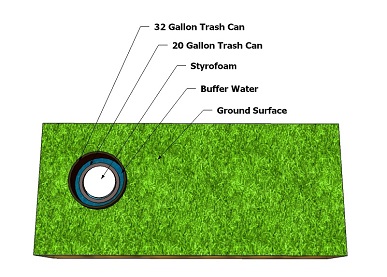
In Ground Geothermal Nutrient Reservoir
Geothermal Energy is free energy. Meaning the
exchange of heat that's provided by the earths soil, is free. In
hydroponics it's common to keep the nutrient reservoir underground, and
has been done for years to help keep the nutrients cool. In order to
get the full effects of Geothermal Energy there are a few things to
consider.
- There should be no air between the sidewall
of the reservoir and the ground. Air is an insulator and will insulate
the reservoir from the ground therefor insulating it from the
Geothermal Energy. Basically the heat wont be able to be extracted from
the reservoir into the ground efficiently.
- For best effects it
should be at least 3 feet deep. The underground temperature of the
earth remains constant thought the year. The underground temperature is
insulated from the above ground temperatures by the Earth's crust.
Typically 3-5 feet is enough, although in places of permafrost, it
should be placed deeper than the deepest permafrost.
- Everything
above ground should be insulated to prevent the absorption of heat when
you pump the nutrient solution through the system. You don't want the
above ground tubing/piping that the nutrients are flowing through to
get hot and allowing the nutrients to heat up on its way to and from
the plants. That would defeat the purpose of keeping them underground
in the first place.
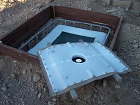
In ground Reservoir
With
hydroponics it is important to design things so they are easy to use
and easy to clean when needed. This is one example of a nutrient
reservoir that addresses the issues above, but allows for easy access
and cleaning.
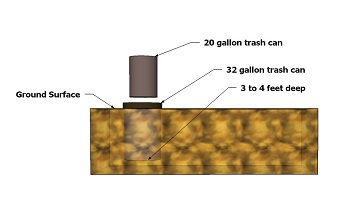
Dig
a hole large enough to to place a 32 gallon trash can in the ground at
least 3 feet deep. Fill in the sides around the 32 gallon trash can
with soil. This container/trash can will be permanently in the ground
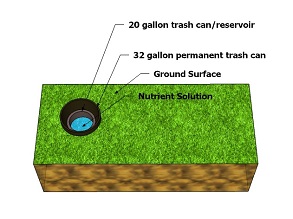
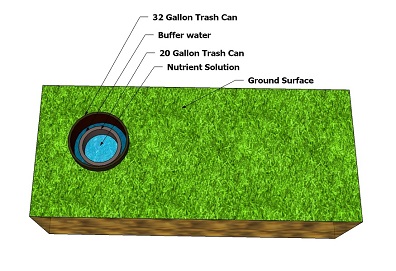
and makes direct contact with the earth (no air gaps). The 20
gallon (smaller) trash can will sit inside the larger one and will be
the nutrient reservoir.
The
smaller 20 gallon container/trash can will allow you to easily take it
out for cleaning while leaving the larger container in direct
contact with the ground.
(Note: these container sizes are not
set in stone. The idea is to have one that is permanently in the
ground, and another one that will fit inside of it that can be easily
pulled out for maintenance.)
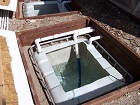
Once
you have placed the reservoir inside the larger container, fill the
reservoir with nutrient solution (or water to pre-test the setup). Then
fill the larger 32 gallon container with water (buffer water) at
least half way or just past where the water level in the reservoir (20
gallon trash can) is. You may need to place a heavy rock in the
reservoir (20 gallon trash can), because if the water level is higher
in the 32 gallon trash can the 20 gallon one might want to float
a little.
The water in the 32 gallon trash can (buffer water)
takes up the air space between the two containers, effectively
continuing direct contact between the ground and the nutrient
reservoir. This will allow the heat from the nutrient reservoir to be
absorbed into the ground cooling the nutrients. Now, to clean the
reservoir all you need to do is simply empty some of the nutrient
solution out, then lift it out to clean it.
(Note: It would be
advisable to add some bleach or chlorine to the buffer water to keep it
clean and to keep anything from growing in it. But make sure that
surface water like excess rain water run off wont be able to get
inside, otherwise the buffer water could overflow into the
nutrient reservoir and it could kill your plants)
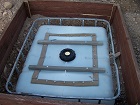
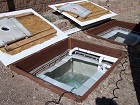
Insulating the top with Styrofoam inserts
Insulating
the top with Styrofoam inserts is quite simple. Cut a circle in a
1 ½ to 2 inch thick sheet of Styrofoam to tightly fit in the 20 gallon
reservoir. Then cut a hole or notch to run the cord and tube for
the pump and cord.
(Note: You can find Styrofoam sheets of different thicknesses in any home improvement store with the home insulation products.)
The
easiest way to cut the Styrofoam is to burn it. I like to use a
inexpensive Soldering iron. You can also heat on end of a metal coat
hanger. The Styrofoam will cut like butter and the heat will leave a
sealed clean edge on the Styrofoam all at the same time.

Now
cut a second piece of the same 1 ½ to 2 inch sheet of Styrofoam in a
circle. This time cut it to tightly fit the larger 32 gallon trash can.
This will help insulate the nutrient solution, but more importantly
insulate the buffer water from surface heat.
(Note: cutting a notch at the edge of the Styrofoam inserts instead of a hole will make maintenance easier)
Now,
cut a hole or notch for the pump tube and cord in the second Styrofoam
insert. Place the second Styrofoam insert in and push it all the
way down to the top of the 20 gallon trash can.
(Note: You may also want to add a handle to the Styrofoam inserts to make taking them out easier.)
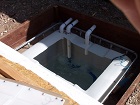
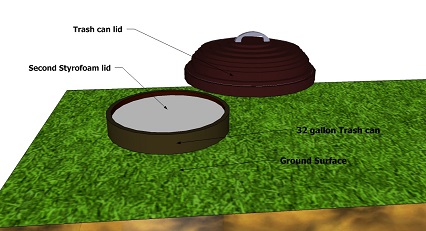
Now
that you have the Styrofoam inserts in place you can mark then cut
where you want to place the nutrient solution return line/tube. Then
mark and make the necessary feed and return line holes/notches in the
32 gallon trash can lid. Place the trash can lid on top and run the
feed and return lines to your Hydroponic system.
(Note: Make
sure you insulate all tubes and hoses that are above ground to keep
them from getting hot and heating your nutrient solution as it flows
through them. If at all possible you should insulate the growing
chambers (plants root zone) to keep them from heating up also.)
Styrofoam insert handle
From
my own experience making a handle for the Styrofoam inserts will make
taking them out much easier, in turn making the maintenance of your
hydroponic systems much easier. Styrofoam is a week material so you
wont be able to screw a handle into it, and gluing one to it wont last
long either. I wanted to add this page about adding a handle to your
Styrofoam inserts to give you some ideas on how to do this.

Because
the Styrofoam is a week material you should not try to attach anything
to the top of it, because it will just tear off and not last. The best
way to attach the handle is through the Styrofoam inserts and from the
bottom. This way the piece is lifted from the thickest part of the
Styrofoam all at the same time.
First find a piece of rope to
use as the handle then make 2 holes in the Styrofoam inserts, barley
large enough to fit the rope through. Once the rope is through the
holes you will need a support for the rope or it will just tear through
the Styrofoam as you pull it up.
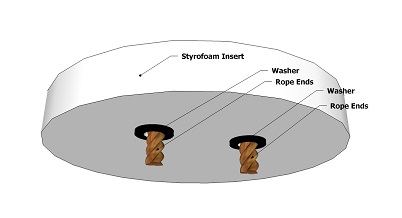
One
way to create the support for the rope is to use large washers (the
larger the more support). Simply place the washers in place over the
holes and glue to the Styrofoam using a waterproof glue, then thread
one end of the rope through each hole and tie both ends of the rope in
a knot to keep it from coming back out. If the holes in the Styrofoam
are not tight agents the rope fill the space with silicone or
waterproof glue to make it stronger and keep any air from going through
the open space.
Another even more sturdy support is pictured to
the right. It consists of the same basic idea, but offers more
surface area
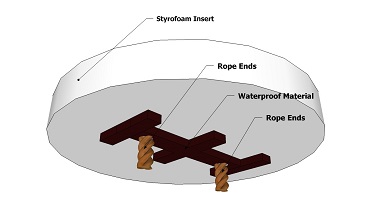
contact
with the Styrofoam for more support while lifting it. Like with the
example pictured above glue the support to the Styrofoam using a
waterproof glue. Then thread one end of the rope through one hole, and
the other end through the other hole, then tie a knot in both the
ends of the rope.
If the holes in the Styrofoam are not tight
agents the rope fill the space with silicone or waterproof glue to make
it stronger and keep any air from going through the open space.