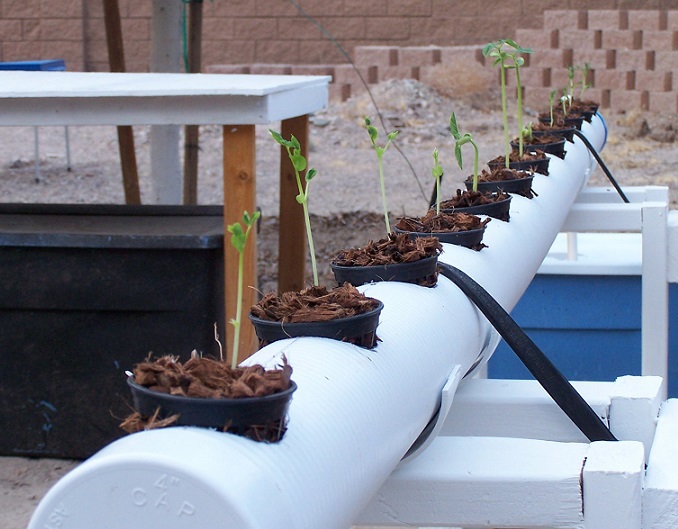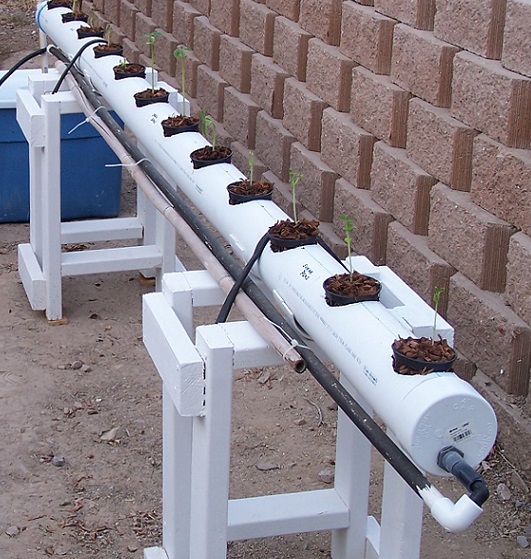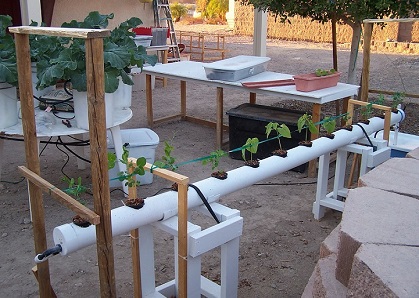
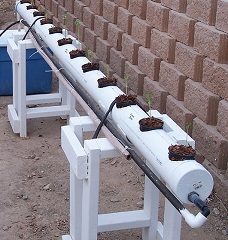
This
is a easy to build hydroponic system, as well as a relatively
inexpensive system, and it works beautifully for a lot of different
type's of plants. I built it to hold 12 plants, but you can space them
as you like. You can also always just cover up any unused openings if
you have to many.
Hydroponic System Design Parts List
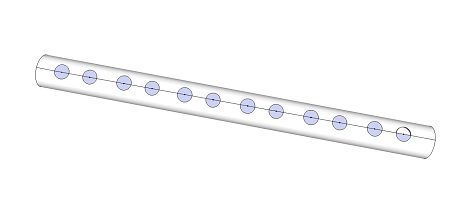
- 1 ten foot long, 4 inch wide ADS tube (Advanced Drainage Systems tubing)
- One 10 foot length of 1/2 inch PVC tubing
- 2-3 feet of 3/4 inch PVC (for overflow side)
- 2 end caps for the ADS tubing
- 1 water pump (submersible fountain pump)
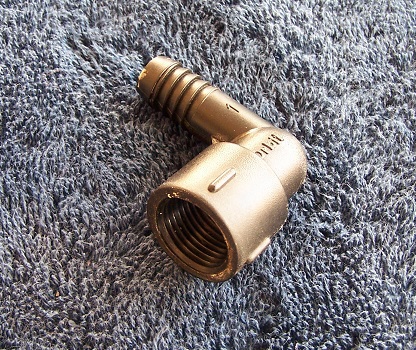
- 2 bulkhead fittings, also called through hole's (ours are from the electrical department)
- 1/2 inch black (or blue) vinyl tubing
- 5/8 inch vinyl tubing
- Minimum 18 gallon storage tote (for the reservoir)
- Two, 1/2 inch PVC connector's (threaded on one side, slip on the other)
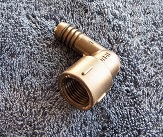
- Two 1/2 inch barbed and threaded elbow connector's (found with gardening and irrigation)
- One 3/4 inch "T" connector
- One 3/4 inch end cap
- One 1/2 inch barbed "T" connector (found with gardening and irrigation)
- Timer with pins all the way around the dial
The
4 inch ADS (Advanced Drainage System) tubing is easy to find. It's sold
at any Home Depot and Lowe's, and other home improvement stores.
Usually near the PVC tubing, but it can vary from store to store. It's
irrigation tubing used to used to direct rain water away that could
otherwise flood an area. The ADS tubing comes with a quick
connect coupling end already attached, used to connect one tube to
another. You want to cut that off first, you can easily cut ADS tubing
with a hack saw.
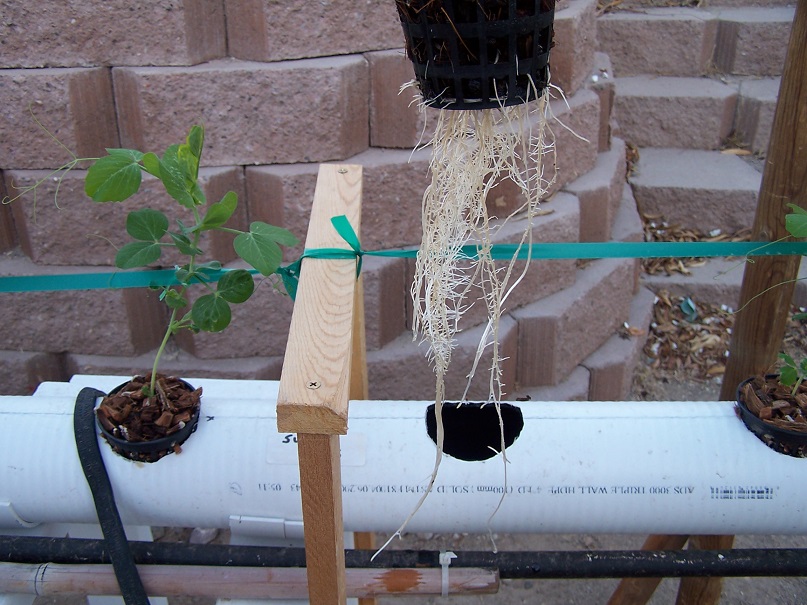
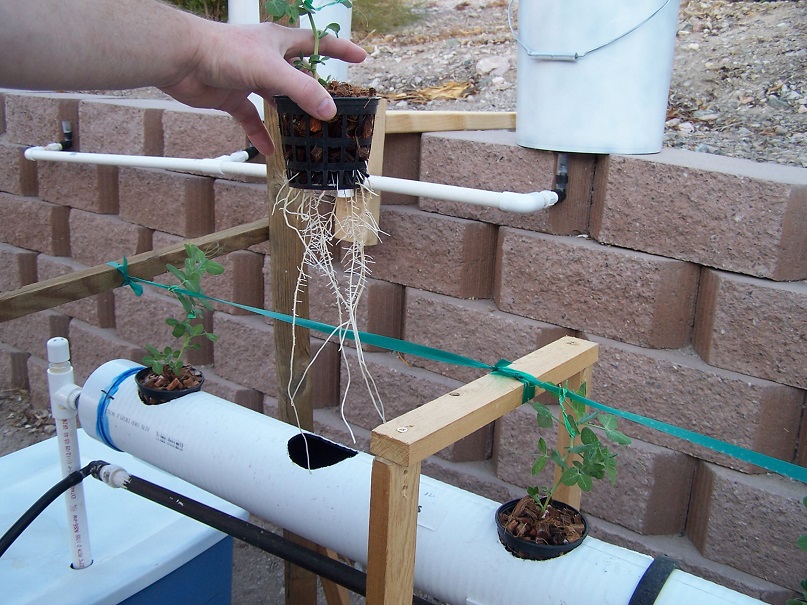
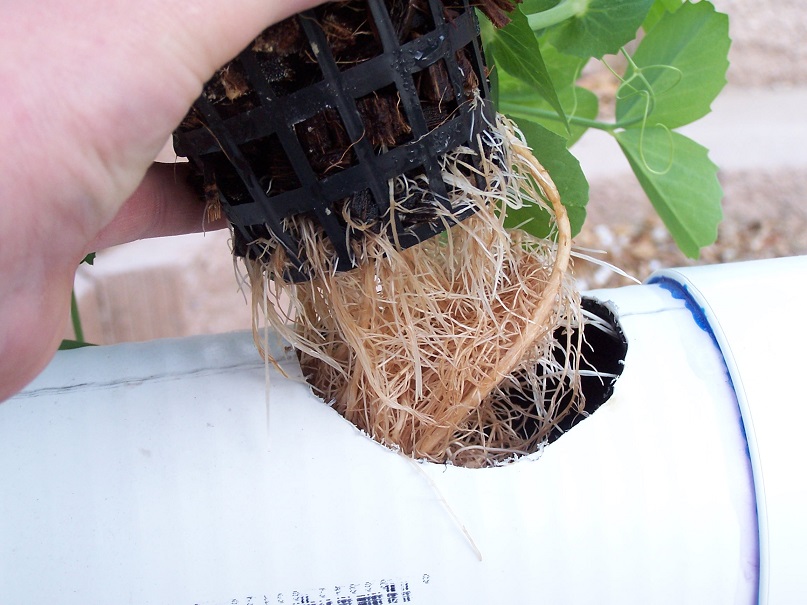
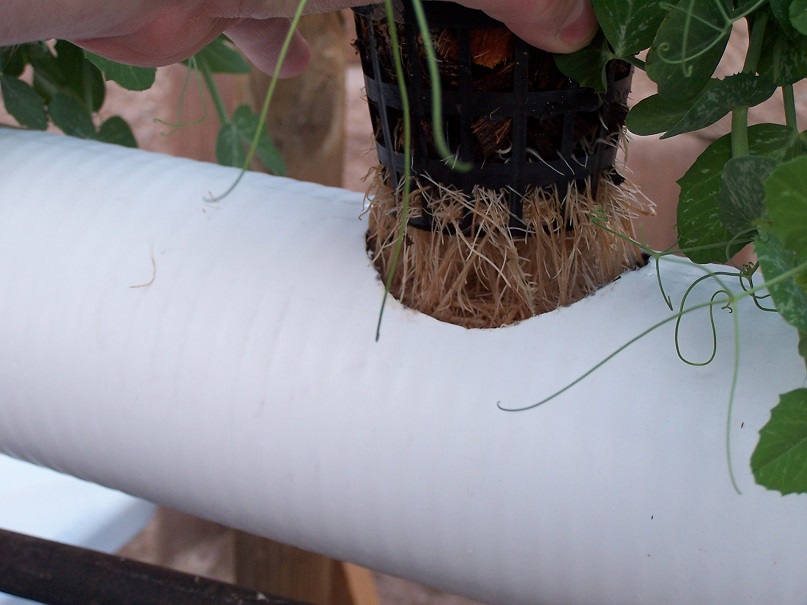
Once you cut off the coupling end, you want
to cut your holes for the 3 inch baskets. But you need to make sure you
have them in a straight line before you cut them out. To do that first
you need to draw a straight line on top of the tube. Make sure the tube
is held securely on top of a table so it wont roll around while
you draw the line. Then have someone hold a tape measure or s
tring
at the top of the tube one side, and secure it in the same position on
the other side. Then take a pen or pencil and draw a straight line all
the way across the tube.
Next make a mark about 6 inches
in on each side on the line. You'll make your holes for the 3 inch
baskets between those marks. But first you will need to make a template
for the holes. Find a plastic margarine lid, or some lid like it from
the trash. The plastic lid is flexible and will allow you to bend it
around the tube to make a good circle. Draw an outline of the top of
your 3 inch basket on it. Now cut it out, but make it just a little
smaller than the circle so the baskets don't fall through. Ounce you
did that, test it to be sure it's the right size. Use the template to
make a circle on a piece of cardboard (or something) and cut it out,
place your basket in the cut out to make sure it goes in nicely without
falling through.
Now make an "X" on the template to mark the
center of it, and drill a small hole on the X. Now you can either draw
your circles by eyeballing the spacing, or measure it out and place a
mark on the line exactly where you want them. If you measured it out,
then place your template over each spot and align the hole in the
center of the template on your mark. Then draw your circle. If your
eyeballing the spacing, place your template where you want the hole,
and align the center hole of the template on the line across the top of
the tubing and draw your circle.

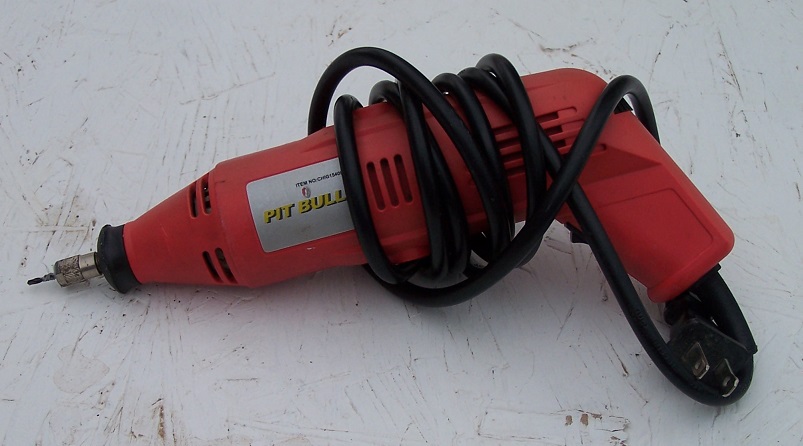
You
could cut the holes out with a hole saw if you have one the exact size
you need, but it's much easier and simpler to use a rotary tool with a
small drill bit tip. Just fallow along the circle you drew to cut it
out. It will cut through the ADS tubing very easily.
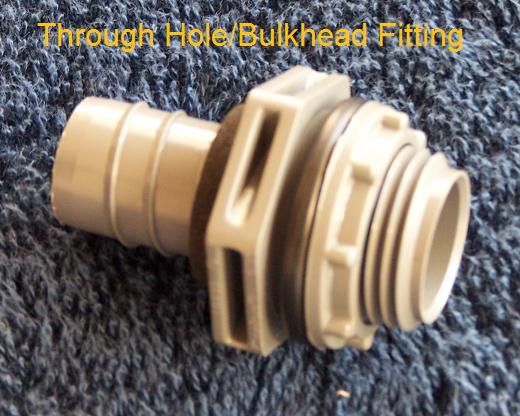
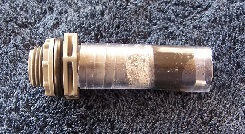
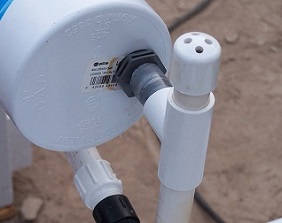
Now that you have the main tube ready, it's time to install the through holes in the end caps. That is where

the water will enter and exit the tube from. Use a small hole

saw
to cut a hole just big enough to slide the threaded side of the
through-hole through. Make the hole near the outer edge of both of the
end cap's, but in just a little (about 1/2 to 3/4 of an inch) from the
edge to give you some working room.

Once
you have the holes cut out, install the through holes. Make sure the
O-ring is on the outside of the end cap, and tighten down the locking
ring good and snug on the inside of the end cap. You don't need to glue
it the O-ring will make it water tight. If you accidentally made your
hole to big and the O-ring wont seat flat, you can replace it with a
larger O-ring, or take it out and use pluming goop instead.
Installing
the end cap's is easy, but you don't want to glue them on. We made this
mistake the first time. If you glue them on you can't adjust them, and
you can't get the root mass out and clean the inside when you want to
reuse it to grow more plants later. You can make a rubber gasket using
some flat rubber bands. Find some flat (wide) rubber bands that fit
around the 4 inch ADS tube. You don't want it to be stretched real
tight, just snug. Use two or three on each end. Then rub some cooking
oil on the rubber bands before sliding the end caps on. The oil will
keep the rubber bands from binding up as you slide the end caps on.
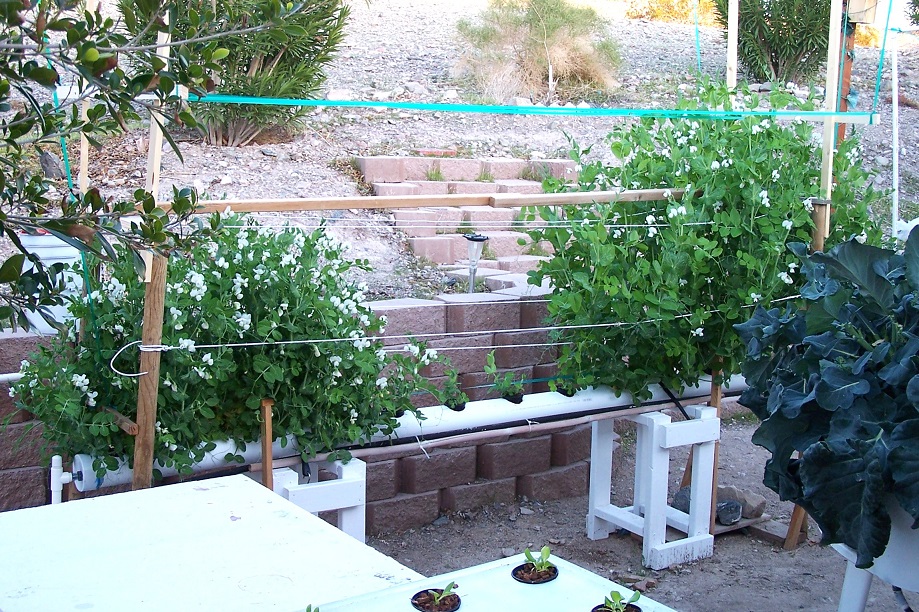
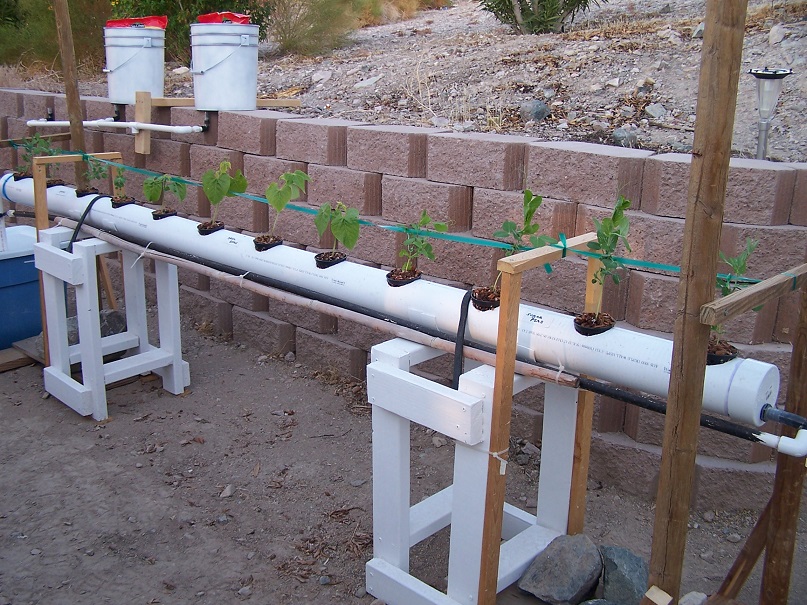
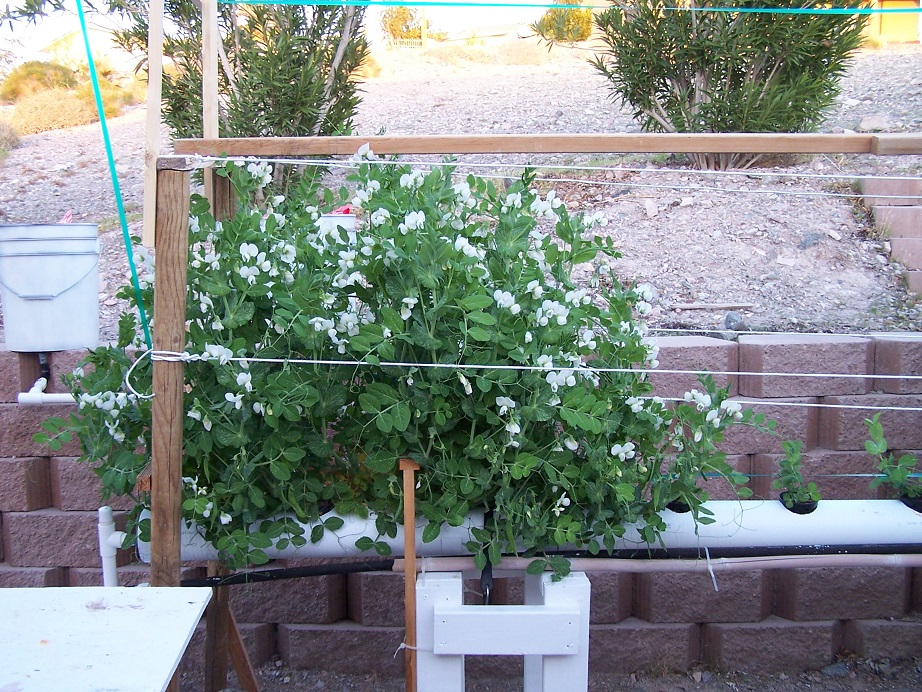
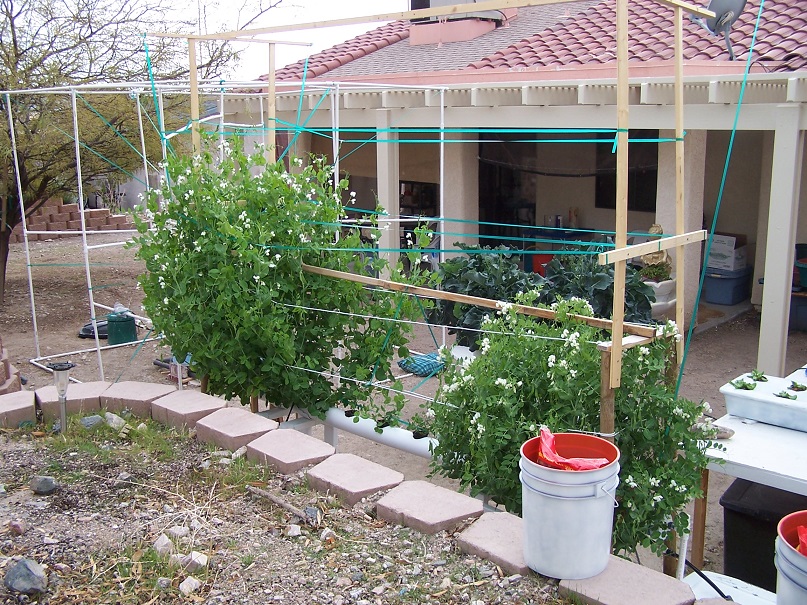
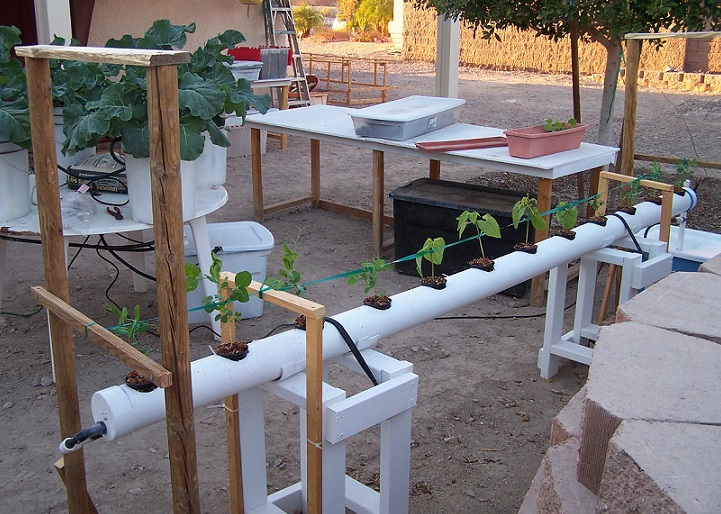
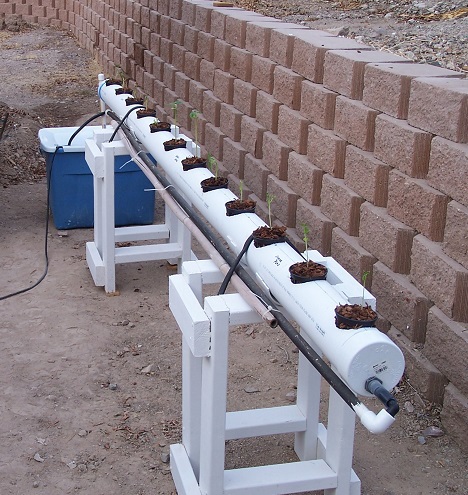
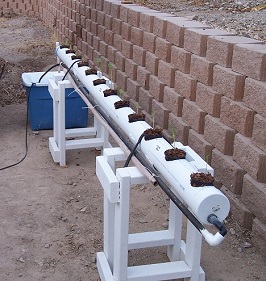
Supporting the Hydroponic System grow tube
There
are a lot of ways you can support the growing tube. The best way for
you to do it will depend a lot on the space you want to put it, and
what you have on hand. We will give a quick overview of the support
structure we built for the system, but you can do anything from using
cinder blocks, to crate's, a tabletop, to mounting it on a wall, or
even along a balcony.

It
really just depends on the spot you want to put it, and your
imagination. The only things you really need to worry about or consider
when supporting the tube are:
1. Make sure it can support the weight. When it's full of water and plants, it can weigh 50-80 pounds.
2.
Make sure it's supported evenly. If you just support the ends, it will
bow in the center from the weight. Then you will have water spilling
out.
3. Make sure it's level. If it's not level you would wind up with uneven watering to
the plants inside the tube, or even worse water spilling out.
4.
Make sure it's secure. You don't want it rolling or tipping over, and
you don't want the wind catching the plants pulling the tube out of
place.
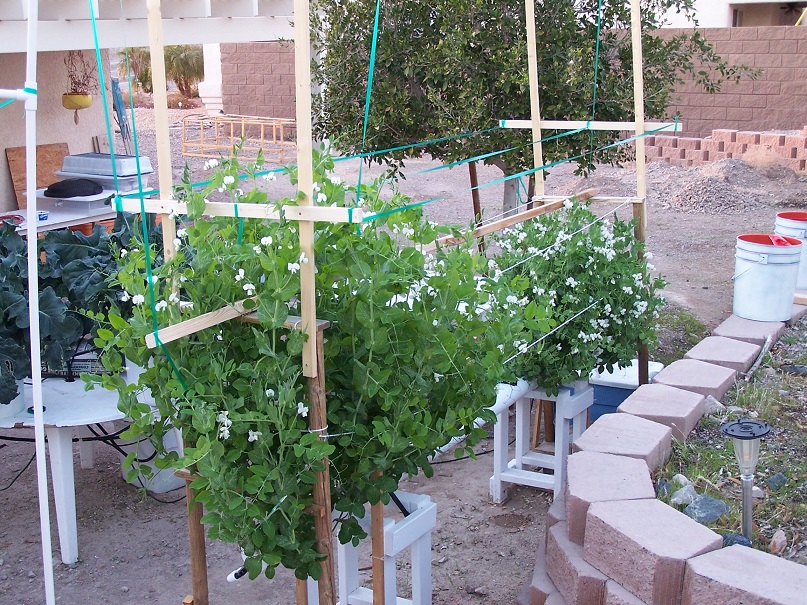
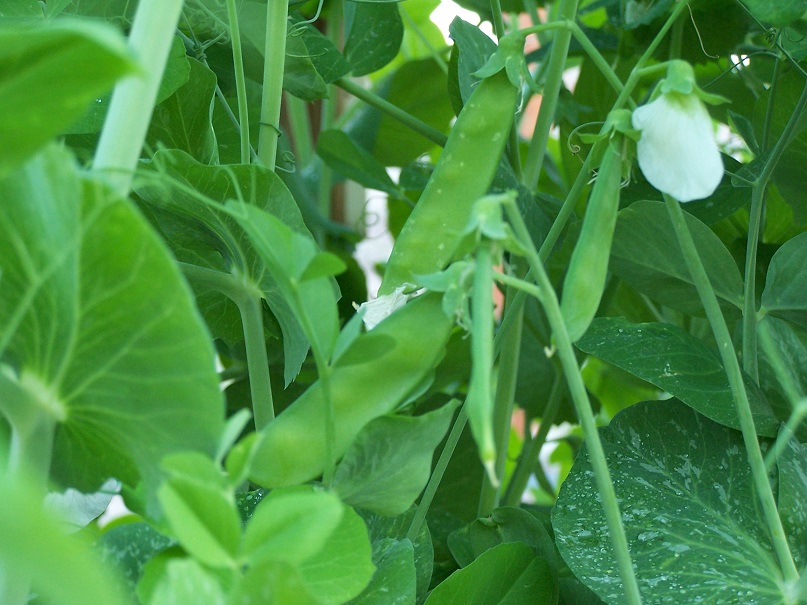
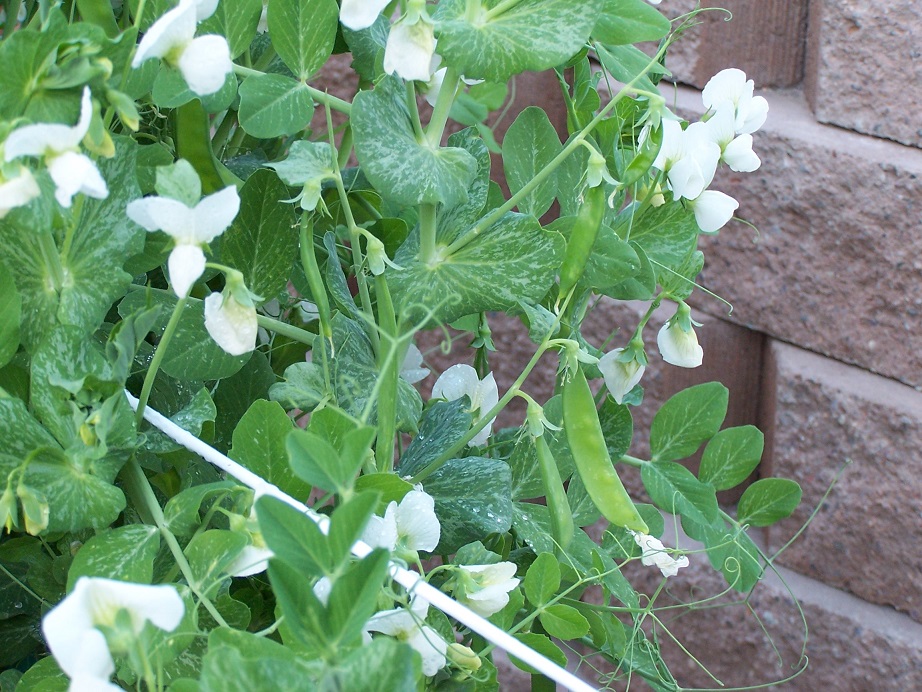
5. If the plants you grow in the system are vine like,
(as the peas we grew in it were) you will need some type of trellis for
it to climb up on.
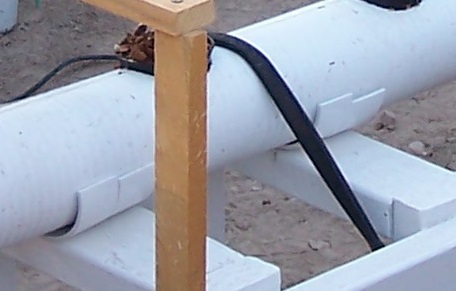
The support system we built for
this hydroponic system was thrown together from what we had laying
around. First we used scrap 2x4's we had, and made two boxes about 2
feet tall. We also had some white paint laying around we painted it
with. It didn't need to be painted, but it just looks better,
especially because it matches the ADS tubing
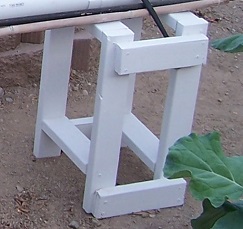
is
white on the outside as well. To cradle the ADS tube on top of
the wooden box frames, we took a coupler made for the ADS tubing, and
cut it into sections and screwed it to the wooden frames. tha

t way it wouldn't roll around. Then just strapped it down with a bungee cord to hold it snug in place.
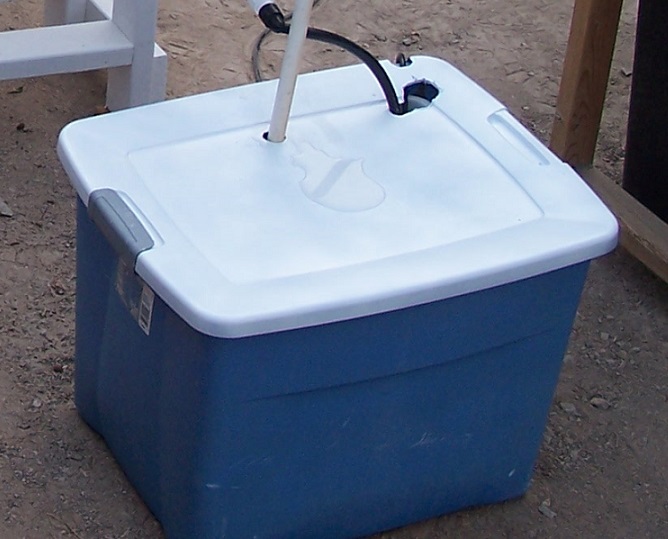
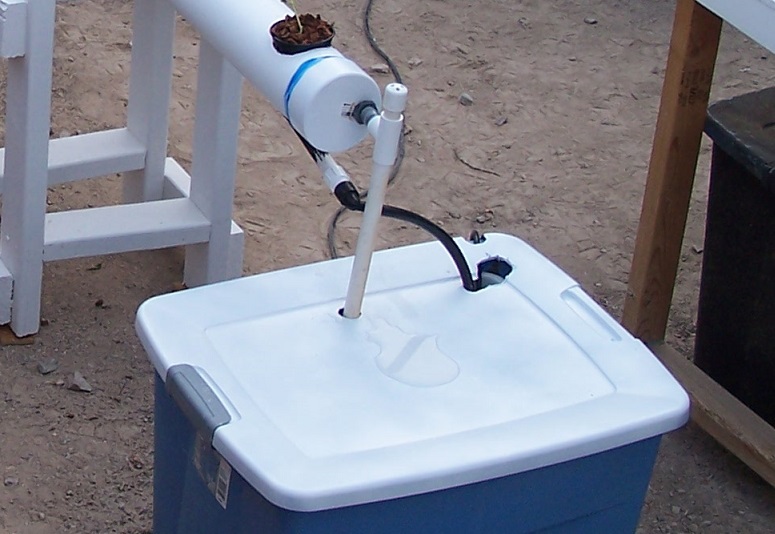
You
don't want your reservoir to be too small, bigger is always better. The
type of plants you grow in the hydroponic system, as well as how many
of them there will be will make a big difference in the size of your
reservoir. Rule of thumb is a minimum of 1/2 gallons per plant for
small plants, a minimum of 1 to 1-1/2 gallons per plant for medium size
plants, and a minimum of 2-1/2 gallons per plant for large
plants. Those are minimums, bigger is always better. But even if
you are growing small
plants
in this system, you will want at least an 18 gallon reservoir. When the
pump goes on and floods the tube, it will take about 10 gallons of
water to fill it, and you don't want to risk your pump running
dry.
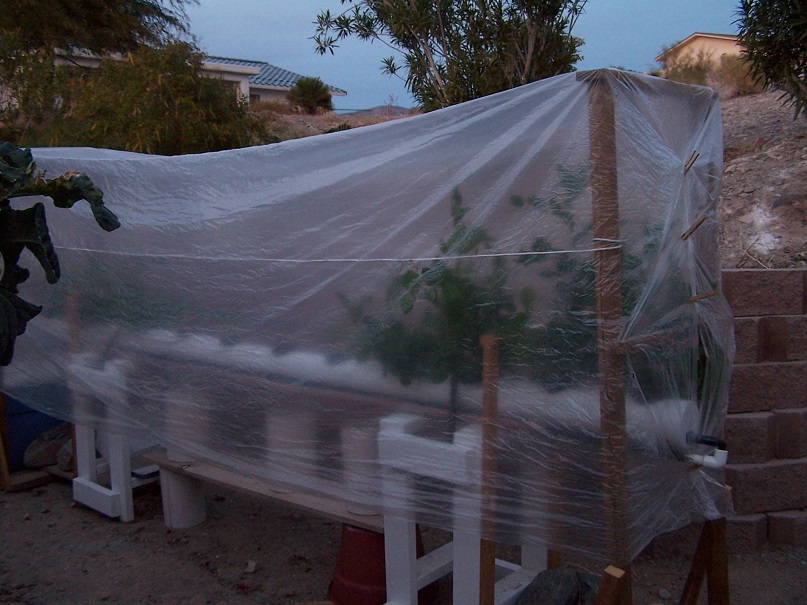
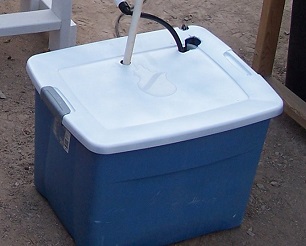
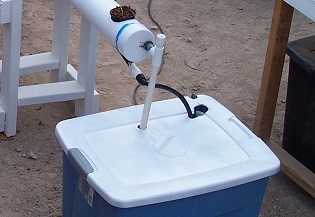
At the time the pictures were taken of this
hydroponic system, the reservoir had not been painted yet. But you want
to paint the storage tote you plan to use for the reservoir with spray
paint. First paint it black to block light from getting in, then paint
it with a few coats of white paint. White will reflect light and keep
your nutrient solution cooler. Make sure to only paint the outside, you
don't want paint in your nutrient solution.

Now
that you have the grow tube and reservoir ready, you can set up the
pump. You could run the vinyl tubing all the way from the pump to the
other side by itself, but PVC is cheaper and we had it laying around.
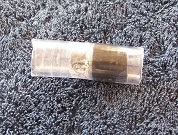
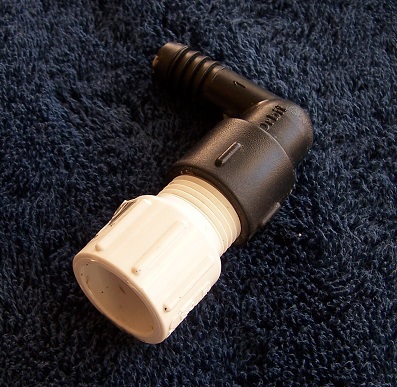
1/2 inch vinyl tubing won't fit on the through holes we used, so we
created an adapter to connect them. First cut about a 4 inch piece of
the 5/8 tubing and slide it on the barbed end of the through hole in
the end cap. Then slide some 1/2 inch vinyl tubing inside the 5/8 inch
tubing and cut it flush.
You
will see that our 1/2 inch PVC tube is painted black, you don't need to
do that. It was one we had laying around that we reused. The
black blocks light, but keeps you from being able to slide on the
connectors. That's why we scraped off the paint at the end. If you want

to block the light inside the tube it's cheaper, and easier to just put some pipe insulation on
it.
Now glue on your threaded and slip 1/2 inch PVC connectors on both
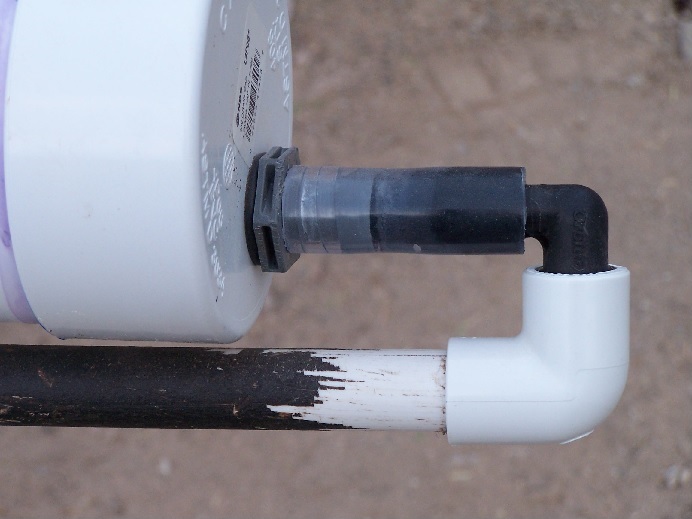
sides of the tubing. Then just screw on and connect the pieces. Make
sure that the through hole is at the bottom of the
ADS
tube for this end. You can easily align it by turning the end cap tell
it is where you need it. That finishes the flooding side of the tube.
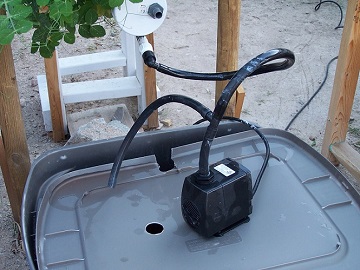
Connecting
the water pump is easy to do. Just measure and cut a piece of the 1/2
inch vinyl tubing to reach from the PVC connector to the pump inside
the reservoir. Our pump was to strong so we added a "T" barbed
connector and another short piece of vinyl tubing. That splits the
water pressure in half. The open end coming from the "T" connector
stays in the reservoir, pumping it right back into the reservoir.
Setting up the Overflow
The
overflow side is easy to set up as well. Cut a short 2 inch piece of
3/4 inch PVC tubing, install it in the center opening of the 3/4 inch
"T" connector. Cut about a 3 inch long piece of the 5/8 inch vinyl
tubing. Push it firmly into the same center opening of the 3/4 inch PVC
"T" connector. Cut a piece about 2-3 inches long of the 3/4 inch PVC
tubing. Install it on one end of the "T" connector. Install the 3/4
inch PVC end cap on it. Then drill some holes in the end cap. This will
keep bugs out while still allowing air in. The air allows the water to
flow faster, and also helps oxygenate the water flowing back into the
reservoir.
The opening is above the water line, so no water
will leak out from it. Now attach the "T" connector to the barbed
through hole by slipping the 5/8 inch vinyl tubing end on it.
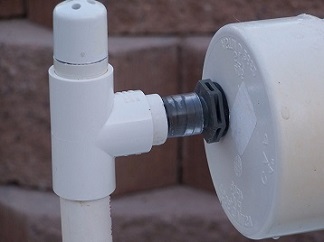
Measure
and cut another piece of the 3/4 inch PVC tubing, making it long enough
to reach down 5-6 inches inside the reservoir, then attach it to the
bottom side of the "T" connector.
Now adjust the end cap
so the through hole is just under the holes for the plants. You will
probably need to readjust it a bit later when you run water in it. You
can adjust the water height in the ADS tube by simply turning the end
cap.
Now just cut some openings in the lid of the reservoir for the overflow
tube, as well as the pump's electrical cord and water line. Now your
ready to grow some plants hydroponically.
Timer
This
hydroponic system is a Flood and Drain (ebb and flow) system. Flood and
drain systems use a timer to turn on and off the water pump. That keeps
the roots moist, and recirculates the nutrient solution. Any light
timer should work, but there are a few things to look for when buying
it for your hydroponic systems. First is look for one that is a 15 amp
timer, sometimes called heavy duty timers. Just check the back of the
package for the specs.
Second is, make sure it has pins all the way
around the dial. You'll need a lot of on off cycles, and timers that
have removable pins only come with a few pins. You can use a digital
timer, but they don't usually have enough settings either, and they
loose memory every time you unplug it, or the power goes out. Third, If
you can, get ones with a weather resistant cover. It will keep dust and
dirt out, and keep it protected if it accidentally gets wet. Even if
your growing inside, you could still accidentally splash water on it.
Happy Gardening!!!